Oil Seal Removal and Installation
US
Войти
Engine Oil Seal Installation Tips - How to Avoid Pitfalls and Hazards
6:19
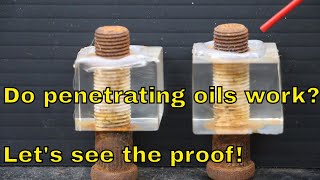
Penetrating Oil Showdown Episode 2. Will Seafoam Deep Creep prevail?
10:58
Adjusting Oil Seal tightness to stop leaks on rotating shafts after dressing out pitting or grooves.
7:13
The Most DISRESPECTFUL Way To End a Game I've Seen
02:46
This Month Was Tough on Us..
25:39
where i have been.
05:45
Oil Seal Removal and Installation
Draft Project
Подписаться
15 тыс.
Скачать
Готовим ссылку...
Просмотров 271 тыс.
0
0
Добавить в
Мой плейлист
Посмотреть позже
Поделиться
Поделиться
HTML-код
Размер видео:
1280 X 720
853 X 480
640 X 360
Показать панель управления
Автовоспроизведение
Автоповтор
Опубликовано: 19 янв 2025
Комментарии • 73
Следующие
Автовоспроизведение
6:19
Engine Oil Seal Installation Tips - How to Avoid Pitfalls and Hazards
Mercedessource
Просмотров 322 тыс.
10:58
Penetrating Oil Showdown Episode 2. Will Seafoam Deep Creep prevail?
Project Farm
Просмотров 19 млн
7:13
Adjusting Oil Seal tightness to stop leaks on rotating shafts after dressing out pitting or grooves.
Isuzu Trooper
Просмотров 26 тыс.
02:46
The Most DISRESPECTFUL Way To End a Game I've Seen
Isaac Punts
Просмотров 743 тыс.
25:39
This Month Was Tough on Us..
PewDiePie
Просмотров 1,8 млн
05:45
where i have been.
Morgan Bailey
Просмотров 109 тыс.
30:07
The Greatest Comeback Of All Time?
JJ Olatunji
Просмотров 1,6 млн
4:44
OLD MECHANICS TRICK TO REPLACE CRANKSHAFT SEALS!
THEMOWERMEDIC1
Просмотров 57 тыс.
21:50
Replacing outboard oil seals the hack way
Dangar Marine
Просмотров 1 млн
19:52
Inside the V3 Nazi Super Gun
Blue Paw Print
Просмотров 2,4 млн
4:45
VTECH 50 - Best Oil Seal Removal Tool For Only $2
Varietech
Просмотров 24 тыс.
7:39
CHEAPEST OIL LEAK FIX THAT WORKS
Fourby4Diesel
Просмотров 2,5 млн
22:36
The Truth About Engine Flush...DONT DO IT! #oilchange #engineflush #dieselengine
Freedom Worx
Просмотров 1,2 млн
9:14
how oil seal works ( animation )
temmy candra wijaya
Просмотров 135 тыс.
9:12
How to replace a leaking oil seal
The Original Mechanic
Просмотров 1,4 млн
10:03
Insane turbo barrel makes 30+ psi boost on FIREWOOD
Camp Dogs
Просмотров 2,1 млн
00:33
Кто яйцо держал дольше?
МЯТНАЯ ФАНТА
Просмотров 1,1 млн
01:02
Подарил АЙФОН 16 девушке на улице за 5 минут
ПОЛЬСКИЙ МАКС
Просмотров 189 тыс.
00:58
КОГДА ДРУГ ПРИШЕЛ НА НОЧЕВКУ😂#shorts
BATEK_OFFICIAL
Просмотров 830 тыс.
01:55
Спасибо всем за поддержку❤️ (только на монтаже заметила разные стрелки🥲)
DO$HIK
Просмотров 63 тыс.
1:30:07
Арестович: Что ждет мир после инаугурации Трампа? @holovanov
Alexey Arestovych
Просмотров 927 тыс.
39:34
Швы сняли, можно восстанавливаться
Деревенька под утесом
Просмотров 140 тыс.
06:03
СОЛОВЬЁВ о российском ПВО и Нефтебазе в Энгельсе 😁 [Пародия]
Юрий ВЕЛИКИЙ
Просмотров 315 тыс.
01:15
МЛАДШИЙ👶 ГОВОРИЛ ГЛУПОСТИ, НО ЭТО ОКАЗАЛОСЬ🤯... #robloxshorts #roblox #brookhaven
Dubrovsky Play
Просмотров 896 тыс.