As you stop down more, you'll get less vignetting. It's pretty standard to end up at f/45 - f/64 with an 11x14 camera doing landscapes. Yep, there will likely be wind movement of foliage. Otherwise, you might consider a 480mm lens. You can save money by getting something like an APO Nikkor in a barrel. At 1 second exposures, it's not hard to use a lens cap for exposure. A Nikon 450m would also be a great option.
Great to know, thanks! It seems like researching further the 360 is really only just covering 11x14 wide open with basically no movements, but stopping down gives a bit more room. I will keep this in mind, and the shots at Zion that I show are between f11,18, so I was helping myself a little, but am interested to see what those very small apertures can give!
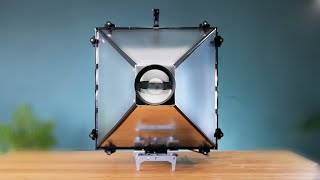
Extremely impressive and elegantly designed on many levels. It could have looked like a janky mess with all the outside-of-intended-pupose parts, but you made it look cohesive. Well perhaps the handle is a little crude looking, but that’s just nipicking. The green bellows and walnut compliment each other in color. It looks like total success to me. Even the bottom with all the bits packed inside is aesthetically pleasing. Nice.
Thanks very much! I had considered getting some kind of an Amplifier Handle, which would be leather and look a little nicer. But I liked the secure feel of the solid metal one in my hand, plus it was already at the hardware store so cheaper and no waiting time!
@@richpence You also get infinity bonus points for making your own bellows. I had notions of building one myself once but when I saw the process I got cold feet. I’ve always wanted a solution to the darkcloth problem and I thought that a bellows with goggles on the end would be cool. Blocking ALL light but without encasing yourself in a hot blanket. I never built it but its one of those things that nags at my mind.
Thanks very much! I actually just filmed a tutorial of the steps for making bellows, I’m hoping it can make the process less intimidating! I am still going to film parts for designing and layout, and then for copying and making fresh bellows from existing broken ones.
Less than 5 minutes into your video and so impressed by your simple built-in tripod approach, I had to comment. I had thought of doing something like this, motivated by wanting to avoid lugging a tripod and inspired by the old wood field cameras that have legs that attach to a large diameter circular opening in the camera base. The "modern" tripod's weak point is that the camera's entire load is clamped on a very small surface area. Why not use the width of the camera to spread that load around? I had no clear idea how I would design this. Now I know. Your solution is so practical, economical and flexible. Now back to the video.
@@iseolake thanks so much! Yes I knew the camera would be very heavy so I really wanted to avoid a tripod to lug around as well! Also the 11x14 base was just big enough to fit the smallest of the monopods I could find. I appreciate you watching!
Congrats on the camera. As an impoverished student I once built a 6cm x 9cm view camera incuding the bellows! Boy so stiff. Crazy project but it worked. Film holders in that size existed then. Mucked around then with 6.5 x8.5 inch on an old Thorton Picard body. Beautiful antique wooden film holders that I still have. My last wooden 4x5 sits on a shelf gathering dust. I'm tempted (just a little) to try it again with paper negs. About ground glass: I ground my own using an abrasive powder that was used to hone microtome knives that are used to cut histopathogical tissue sections. Two bits of glass of the correct chosen size (you get a spare in this process!) Some powder between them, water to make a thin slurry annd rub them against each other on a firm flat surface (larger heavy glass IIRC is ideal) with firm pressure until the whole surface is ground to taste. Replenish the slurry as required. Tip #2: a small central spot of grease or oil on the ground face clears the glass to allow critical focus on what is the aerial image. Thanks for the vid.
Awesome to hear about your homemade cameras! Yes I am familiar with the hand grinding process for ground glass, I have done it a few times before for 4x5 cameras, it works very well, and if needed to be sourced locally one can use fine valve grinding compound from an auto parts store, it is a similar ultra fine abrasive powder but pre suspended in a paste form and handy tube. Though these days, I am really a fan of frosted or even hand ground acrylic, with a fresnel lens added it is very bright, and the main advantage is it will not break and shatter and cut up your bellows when it is eventually dropped or hit with something.
As I've toyed several times with the idea of building my own 11x14, I'm awe struck by the elegant, yet, simple design of your camera. Just beautiful! Now you've got me thinking, again... Thanks so much for sharing this project.
I love your appreciation of quality. This if the first video of yours I've seen but I can tell the amount of love and consideration you've put into the construction of this lovely camera. It reminds me of working with my grandpa in his wood shop, making everything to not only complete it's task but to look and feel good doing it. You've inspired me with soo many ideas in both my photography and camera construction, I'd never considered making my own large format camera simply for what I thought was a more extreme cost. Thank you for sharing such an amazing project, I can't wait to see more videos from you.
Thank you very much! please subscribe if you'd like to keep up to date on my projects. In the next month I am hoping to get my 4x5 DIY plans and video out, my goal is for anyone to be able to make a 4x5 camera for $200 or less. I am even working on a super simple and easy to source lens.
This was an incredibly well put together video. I've been tinkering with moving into large format for a little while and your use of the off the shelf parts is brilliant. Obviously there are tradeoffs, but you explain them well and I'm more motivated to build my own. I liked and subscribed because I'm very interested in the video you teased about the accessible DIY 4x5 camera (seems more approachable for me getting into large format that 11x14).
Thanks very much for subscribing! Yes 4x5 is a great way to get into large format, and I am very excited about the 4x5 camera project, and am hoping to get it done in less than a month.
@@richpence Hey Rich! Just checking to see if you have an ETA on that next video? I just got a LF lens in the mail today and I'm trying to decide what approach I'll take on the camera build for it. Thanks!
@@DannyZawacki Hi there! Teaching / school has started back up so I am slowing down a bit. The next video will be a bellows tutorial, and hoping that will be done in the next few weeks. Getting time to get my 4x5 design together will likely not happen much until mid October or so.
@@DannyZawacki Can I ask which lens you have, and what kind of camera you are interested to build? I may be able to offer some advice. If you want a very simple camera to just start making some photos with, I'd recommend taking a look at Morten Kolve's WillTravel 4x5 camera. it's all 3d printed and no movements, but via his Ebay store the camera, fit to your lens, is around $180, he also offers his 3d files totally free if you want to print or order prints yourself. It's a great simple camera to just start shooting on.
You really nailed down the simplicity, usability and still have good look! Looking forward and I hope there will be detailed videos about each part. Now when everybody are trying "vintage" lenses with 16-24 Mpx sensors squishing more vintage juice out of them ( I've also done that - but this did not fill the void ) . Having such camera will create images that will be totally out of range for digital photography for many years ( and still be in very affordable price! ). Have You tried convert such camera to the dark room enlarger - with the the DIY strong light source. THANKS!!!
Hi! Thanks for all the compliments! About the enlarger, I actually do plan to make this camera into some kind of enlarger someday with a large light source. But if you look at the section in this video where I show the 4x5 camera that I built, I have actually turned that camera into an enlarger and it worked quite well. In the Ansel Adams video I made last year, there is a section in it about darkroom light sources and I show the kind of light source that I used to do that, I’ll keep it in mind for future videos!
The way you emphasize the simplicity of using off the shelf parts is wonderful. Having your tripod incorporated into the design must save another several pounds. If you could source carbon fiber fittings you could save on weight, but the cost would be higher. Great job and a very nice descriptive video.
As a student, currently and in the past, I never had the kind of money to own “dream cameras”, like Gibellini and Chamonix view cameras, leicas, Hasselblad X-Pans, so I would try and build them myself. These days, I hope to make the kinds of videos and camera designs that a young me would see and be super jazzed to be able to easily gather the parts, make their own designs, and make a camera over a weekend or quiet summer. I would love to have custom built and designed every piece, it could certainly be a lot lighter, but I also am a sucker for the speed of getting off the shelf stuff, and also the promise of being able to replace anything easily, or modify for other needs, and start from that design principle. For example, this camera is really just the folding box, and a front standard glued onto bellows, the rest can all be easily removed. If needed to lighten it, I could just make a single frame with an arca clamp to put the front standard on and skip all the movements.
I use the same loupe for my monorail 4x5, a fantastic cheap alternative to the photography specific ones that cost a surprising amount. Awesome video, really cool project
haha thanks! I'll for sure have to get a Pro Mist filter or maybe some Vaseline and expired color film. Will have to do a Caffenol/dr. pepper film soup and double cross process.
Awesome job! I saw your post on FB and forgot about the project. I just so happened to chance upon this video while scrolling. I have that same lens, but have only ever used it for 4x5. It’s so cool to see it reach its maximum potential on 11x14 I am VERY excited about the DIY 4x5 video you mentioned towards the end. I had a sort of “d’oh!” moment when you went over the individual components that make up your camera; how had I never thought to do that before? Anyway, nice work! Looking forward to seeing more of what you’re doing +1 to your wife as well. There are many cool projects that do/don’t exist largely due to the support (or lack thereof) of friends and family.
Thanks very much for watching! Yes I am very grateful to have a supportive wife and friends! I have been really enjoying the lens, and a few days ago I sat down and etched in all the centering marks and it turns out I have been putting the lens with a slight bit of rise from what I thought was centered, there is plenty of coverage. I was just shooting on my original homemade 4x5 yesterday, testing a diy large format lens I’m working on. And seeing all the places I can improve on the new one has gotten me excited to keep working on it! It will be mainly 3D printed then added onto the base parts I showed. But for those who don’t have a 3D printer I am looking into various online printing companies, and want to keep the price of ordered parts around $60 or less. The ground glass (including a fresnel) will be sourced and bellows will be made from material. And I’m hoping for the camera with ordered 3D prints to still be less than $200.
Awesome detailed video! I saw your post on a Facebook page a while back about this camera, so cool seeing a video about it! I was in Zion with my 4x5 last month and I’m working on my own video about my photos from there
I would love to see a few videos of you using this camera in more places, circumstances, etc, and showing your progress learning to get the best photos out of it.
That was inspiring. Earlier this year I was talking myself into making an 810 in the Chamonix Alpinist style for backpacking. A car-portable easel style rig seems much more attainable for a "first go". Tons of great information and insight here. Utilizing the arca plates is genius: way more attainable than trying to fabricate custom pieces. Great stuff!
Awesome! Thanks very much for watching. I hope you try and build your own camera! Maybe try actually just using a box field panting easel, looking at my Wife’s I believe it could be turned into an 8x10. There are several on Amazon for $80-$160, you’d then have a folding box on legs, to reinforce, add arca for movements, bellows, and figuring out how to route and make the spring back. Maybe easier to just do all from scratch.
Thanks very much for the compliments! I recently moved to Arizona / western US from the Eastern US, and I’m amazed at the nice hardwood selections you can find here even in Home Depot.
@@richpence Very cool! While watching, I had an idea for an "upgrade", for connecting the dark cloth to the camera. Instead of using the clamps, perhaps either of these two options work (and leave the need to carry clamps) 1. Velcro. Having it stitched onto the cloth, with the other parts on the wooden frame. The only downside would be the noise of taking the velcro off (might be an issue in nature) 2. Metal rings on the dark cloth, that you can hook on little latches on the wooden frame
@@MickBenjamins good ideas! I like the metal hook one, Velcro to me is just not a very attractive material compared to the rest of the camera. I think what maybe I would like is some fabric strips with riveted snap buttons at the top corners inside the box since I am considering a similar method for making some adjustable straps for the bellows droop issue.
I’d be interested to see it! The use of those off the shelf arca parts really lets you be more imaginative in your design. The integrated legs are my favorite part of my camera, but for an 8x10 the would be tough to fit the lens inside.
@@bonnevillegarage Yes I have some more closeup photos and behind the scenes of the building. If you are on Facebook, join the Large Format Photography and Handmade Film Camera groups. I have posted many photos about this camera. Also if you are on instagram my username is Richpence like my youtube channel. I have posted more photos about this camera, but also you can feel free to send me a message asking any specific questions and I can take more photos of parts of the camera.
I am excited for it and working on it right now, it will involve some 3d printing, but that is something that anyone without a printer can send off to various companies online to have prints made for them. The rest of the parts will be collected from amazon, and the bellows made by the user, my goal is for the whole camera to be under $200 total (potentially including a super simple lens I am working on)
So cool! Great work on the camera and the images! You may have already figured out the lens coverage question, but if not, I did a little digging out of curiosity. According to the lens data provided by Nikon, the 360 will cover 415mm at f6.5 which is just shy of 420mm, which is the diagonal of 11x14. In your video, it appears that you may have had a little bit of front rise, which could account for the clipped corners. It's also worth noting that the data also notes that the same lens covers 494mm at f22. So, stopping down will give you more room to breathe. I hope this is helpful. Thanks for sharing your work on RUclips!
Thanks so much for the info! I actually had a pretty significant amount of rise for some shots, and those were between f11 and f18, so that explains it! Great to know. I will leave the wider apertures for portraits or still life with little movements (the longer lens distance should help with the coverage) and will stop down more for landscapes. What I really need to do as well is to really accurately measure out when the front standard is exactly centered and note / etch marks for setting up the camera to perfect center.
With regard to vignetting, keep in mind that infinity focus creates the smallest image circle because the front standard is closest to the rear standard at that distance. The closer you are to the subject, the greater the image circle will be. You may experiment with not focussing all the way to infinity and stopping down to bring the picture into focus. I don't know how much extra coverage that might create. Also, be very conscientious with checking that your lens is centered. Any movements will exacerbate vignetting.
Thanks for the tips! Yes image centering was actually my biggest issue here, I had started with the lens not centered, which a couple days ago I actually measured and etched the rails so now I start perfectly centered. Stopping down more in general will help, at f22 or more I should be able to get a good 30mm of movement from center safely.
Dude... you are on another level... seriously impressive... I now have to go rebuild the P.O.S. 12x12 .... my mind is spinning ... thank you soo much for the effort in making and sharing this video...
Really interesting video and excellent work. A really interesting and different approach to building/assembling a LF camera. As soon as I saw it I wondered how you would produce the bellows and front standard. It was a complete surprise how you built the FS. Would never have occurred to me but then I am no way an engineer. The bellows ? Respect ! I'd have wimped out and ordered a set. Great work though and an excellent video !
Thanks very much for watching! And there may be hope yet, I am making good progress on a bellows video, showing the full process from designing to building.
I’m happy to answer any questions you may have, and measure out and explain how I worked, but I actually do not have any drawings or plans because I did not make any. When building in wood, I always measure everything off of the parts I have in front of me. For cameras it is a balance between the known exact parts that are critical, and then designing fluidly around those to make everything work. The most crucial sized parts are the exact dimension of the film holder, and then building the ground glass frame and the spring back to perfectly match and fit. The same goes for any lens mount. Then I gathered all of the off the shelf arca rail parts, and the rest of the design was just measuring to what felt like it would fit best for all of those parts to work and collapse into itself. But the parts you collect and find may be different from the parts I have made. Maybe some day I will draw up exact plans of stuff like the spring back, but also I am not totally sure that the design as I have made it is exactly the best possible for expecting others to make from plans, it could likely be simplified and optimized for more people to be able to make. That’s kind of why I didn’t make a really strict step by step of the building for this video, since I haven’t optimized the recipe and steps to be able to show them exactly, there was a lot of trial and error for the making of this camera.
Haha I have gotten a few questions about that. For now this one is the one and only from me, I’m in Grad school so have no extra time for taking orders. But maybe someday I will open up to some orders. My main goal is to give everyone as much as I can for them to built their own cameras!
Thank you for your video! Apologies for the long-winded and poorly written comment... :P I recently made myself an 8x10 camera, and it was fascinating seeing similarities and differences in your design. The idea behind my camera was primarily cost reduction. I like your use of off-the-shelf Arca hardware for your front standard; makes the camera behave more similar to a traditional view camera. I see no issue in using a sliding focus VS. a rack and pinion. I agree wholy on your sentiments of the bellows and film holder situation being the most difficult. Because of my stubborn cheapness, I made my own film holder instead of buying one. It functions, but is a rough affair, and I hope to remake it using a router. It's impressive you made a tapered bellows! Mine is square. I also went with a blackout curtain material (fabric) for the exterior and have it bonded with a black fabric for the interior using fusible webbing. I am very interested to hear more about your blackout material, please do a video! Have you thought of making your own ground glass, or would it be too fragile and heavy for your purpose? I found it to be quite simple and allowed for fine-tuning of the ground glass texture/granuality. I'm curious if you know what focal length the fresnel screen should optimally be, I have some but not attached. In the future I hope to make a condenser lens focusing screen like what may be found on some SLR cameras (impractical but it'd make me happy) Your choice to use an existing large format lens is smart. My camera has an old Beseler 14" f3.5 projector lens, and I adore its rendering but despise the lack of a shutter and iris. I plan on implementing a Waterhouse stop and Packard ideal shutter in future. Funny that we did the exact same thing to attach the rotating back! Some threaded inserts and some knobs works well enough! Good idea to use the monopod legs! Mine is currently a legless slug, but I plan on adding 8 legs >:D It's rear and front standard are only attached using the bellows, so I need each to have their own adjustable legs. Thank you again for the video!
Hey thanks so much! I really appreciate hearing about your camera! I'll try and answer each of your points. I have found the push pull focus to work totally fine, it is almost surprising how much fine control you can gain just with your fingers. for film holders, One of my other design ideas behind buying (at least one if you can) standard holder really is important so that you can have an example of the "standard" international holder size. I was surprised to learn that 11x14 actually does have a recognized standard size, so it was important to me to be able to build my camera to fit that standard. For your 8x10, it may be a good idea to get at least one standard holder, even if a kind of old or beat up one, so that you know your camera can use other such standard holders when you can get them. Luckily 8x10 holder are a bit more available and easier to find, and having an example of construction and materials is much easier with a hands on example. About the Bellows, I've also made some using the white blackout curtain liner material. I like that it has a white appearance, but I found it ended up quite thick. I will be working on the video in the next few weeks! I have a few projects that are needing many sets of bellows so I will be able to get the video done soon. I really only have the free time to work on videos like this during the summer as I am currently in Graduate school for my Masters in Fine Art. I have made my own ground glass a couple of times for 4x5 cameras, and you are right about the niceness of being able to fine tune, but for the 11x14 being so big I really did not want to take the risk of glass that big breaking. I really like the security of the acrylic. Also the price and time saving is hard to beat, for example for the 4x5 design I am working on, I want to remove as many obstacles as possible for people making their own, so simply ordering a piece of acrylic and some of the handheld office Fresnel magnifiers for $15 total is hard to beat, and that is enough for 4 sets of ground glass, which I will experiment with carefully sanding the acrylic further with grinding compound or sandpaper. Speaking of the Fresnel lens, that is a great question, I don't know the focal length, I did not test and the listing does not say. I was just happy to find one big enough easily available for $30 on ebay! I for sure splurged on the lens, but I set out knowing I would really be investing a lot of time into the camera, and hopefully a lot more in using it for all shooting situations. I had considered a few projector style lenses for around $200-400, and ultimately decided that the extra $300 for a modern nikkor in a great shutter (I think it's my most accurate leaf shutter in my collection) was more than worth it. However, a small teaser! for the DIY 4x5 plans I am modeling right now a super cheap lens design for simple scientific experiment double convex lenses available on amazon for around $15, they are a bit soft on the edges, but they do provide a bright and sharp center. I will design them with a simple shutter and to 3d print to fit on a linhoff style lens board, they even sell the lenses at focal lengths of 200, 300, and 500mm in a set for $15 total. The threaded insert back just makes more sense for simple DIY building! Much easier to design and build and easy to fix. Wow sounds like you are making a spider! I may suggest 6 legs though, or really I'd suggest just getting 2 tripods. 4 legs will almost always wobble! but # legs never will! that's the advantage of three. Right now on amazon there are some very nice twist lock leg tripods for great prices, for example a 74 inch one by CAMBOFOTO is on sale for only $40. So unless you will be building your own legs, getting two tripods may be your best option. Cheers!
@@richpenceThank you for your thorough response to my lengthy comment! I'll try getting a hold of an 8x10 holder to compare. The white blackout curtain is certainly on the thicker side, but not too much so. I'm able to get about 3.5 feet of bellows draw and it folds up down to about 4 inches. Yours seems much more compact. I'll make sure to keep an eye on your channel for any upcoming videos. I understand it is difficult to find the time. 3 legs is certainly the sensible answer but, I'd like to try my 8 legged spider monster :P . I think I can make it self-leveling. Thank you for your time!
Amazing work! Sourcing machined parts to fit the design is what has always hindered me from building my own camera. Love the information and that you shared all of it. Lovely camera!
I would too! I’m fairly unlikely to shoot any though, it is around $30 per sheet, and most of all it is quite difficult to process at this size. Maybe someday! I think 8x10 film and cameras is more feasible for shooting large format color film. If you have not yet, check out Ben Horne’s RUclips channel, he shoots 8x10 color film almost exclusively.
Thank you so much for your effort to create this video and build this wonderful camera. Its such an inspiration to slow down more while taking pictures.
I am so glad that you made a video on this, I saw your original post on facebook and my jaw dropped! I will be respectfully ripping off the tripod base idea for my ULF camera in the future, but first the small cameras need to be made.
This was fascinating to watch. Your intuitive understanding of camera construction, understanding of how light travels and your ability to source material from just about anywhere make me want to go out and explore this for myself. I currently have both a Sinar and a Graflex 4x5. Thinking about making a hybrid build between both of these cameras with extra features designed into a single unit. So many things to think about. Your post processing skills and add in video explanations were very helpful. Subscribed and liked to assist you achieving 1000 subscribers 😊
Thanks so much for watching and for the compliments! I hope you do make or customize your cameras to work well for you, maybe save some money for more lenses or film along the way! I was just using my DIY 4x5 yesterday to test a diy large format lens I’m working on. But I realized that my old camera is not as great as it could be, so I’m looking forward to finishing my next project of the affordable 4x5 camera, so I’m hoping that will be out later this summer!
Really really amazing job. Well done! You might already know this, but the Nikkor W 360mm has an image circle of about 494mm. On 11x14 this gives you roughly 1 inch of movement in any direction before vignetting occurs. I suspect excessive movemens may have caused the vignetting on your Zion image. Looking forward to more videos.
Thanks for watching! Yes that is correct, I was giving too much movement, but another problem is that I hadn’t yet really measured and etched the rails to know that I am starting from perfectly centered! Which I have done now, so now I will be starting from a better place.
Nice work building your own ULF. It is well thought out and I love the built in tripod. You might find a larger dark cloth well work better especially when you are in a bright environment. Well done sir
Thanks very much! I have some bigger cloths I can use, but I like that the small one fits easily in the bag, and in the summertime heat it does not get as hot underneath. I know I can have white fabric on the outside, but I am in Phoenix AZ, so it does not help much in 110 degrees. I’ll take any kind of breeze I can get under the cloth! Plus the lens is quite bright at f6.5, so have been bright enough so far.
Awesome.. I'm just starting out with my 11x14 build and find this video very helpful. Although my planning is slightly different to yours I am curious what focal-length Fresnel lens you got?
Awesome, best of luck on your build! And I’m honestly not sure what the focal length is, it is not listed on any of the selling pages, and I didn’t think to measure it before installing in the camera. I can say that the one I got works very well. The options are quite limited, so I just went with one that looked right and was a good price available new. Searching for the 300x400mm or 320x400mm ones seem to yield similar results, and you could even reach out to the seller and have them cut you a custom one, I’m sure they could tell you the focal length.
Thanks for the comment! I simply got a little overzealous with the rise on my images, but you are correct. Larger formats always remind me that the diagonal mm measurement of any given film frame is the same as it's 'standard' lens. For example the diagonal of 135 film is 43mm, so most choose a standard between a 40. 45, or 50mm, and maybe a 35mm on the wide end, only Pentax has been brave enough to make a lens at the "true" standard focal length with their FA 43mm f1.9 Limited (I am a Pentax fan). But back on topic, the 450 is the standard lens because the diagonal of 11x14 is around 450mm, so as long as the lens can cover that it will be ok. The Nikkor w 360mm is wider, (Around the same as a 35mm focal length on 135 film) but the image circle is 495mm at infinity at f22, so it does cover. I just simply overstretched the rise and did not check the lens coverage carefully enough, the bigger format means that my spare 35mm or so of rise does not go as far as it would on say a 4x5 camera. Something to get used to, and I also really need to measure and calibrate / mark my rails to know when I am starting from exact center for full coverage.
Thank you! I will see about making a video on that! I have actually made a video going over some more advanced contact printing processes in my Making Large Negatives in the darkroom Video that is already up if you'd like to take a look, it has lots of contact printing in the process.
Congratulations on the realisation of the optical bench! Looks like you're back in 1800! I have no experience of optical bench with large format film, but only with Hasselblad 500CM. I just remember that I got to see up close an optical bench (I don't remember if Linhof or Sinar or another brand) of a friend of mine in his photo studio. Impressive to notice the great detail and dynamics of the shadowed parts of your photos. For the filter, instead of having it internally, why not have a slide on the front optics so that you can also use other filters, red or blue? About the fall of light at the edges depends on the optics? For a larger format print than film how do you do it? Do you digitise the negative and then print on plotter? Anyway my compliments for the construction.
Thanks very much! I will try and answer your questions. For the filter, I worked with what I had available. I knew I would be using darkroom photographic paper as my negatives, so I had to use that specific filter type. Some also use regular yellow or orange filters for the film, but the issue is the size of my les. The Filter thread is 95mm, a odd and very large size, so filters are hard to find, and when you do find them, they are extremely expensive. My solution worked for what I need the camera to do, and the filter is always easy to remove in just a minute, and the filter is the exact best kind in my opinion for the negatives I am making. The paper itself is darkroom paper, so it is actually designed to not be sensitive to RED light at all, and inside of a camera it is extra sensitive to blue and UV light, so the filter is helpful. The filter will also work quite well on black and white film to darken a blue sky slightly. I would only really need to remove it for shooting color film or paper. Yes the lens light falloff is a matter of the lens I have, and giving too much movement up to see the mountains level. If the lens were to be centered and the whole camera tilted up it would cover the whole image. For prints I still make them in the darkroom! I sandwich a new sheet of paper under the face down negative and use an enlarger to shine light through the negative. This process is called "Contact Printing". If you look at my video "Making Analog Alternative Process Negatives in the Darkroom: Ortho Litho Film for Cyanotypes" You can see my darkroom and several versions of contact printing in action.
@@richpence Thanks for the reply. I know very well that square filters for large diameter lenses are expensive! On the other hand they have the convenience of removing or inserting without having to dismantle the optics. I have no experience with prints from very large format negatives but only 120 from Hasselblad. Yes, I had heard of the contact printing technique, but if they ask you, for an exhibition or for home furnishings, for a larger print than the negative, what do you do? I was curious to know having seen your very high quality negative from which, for example, a 2 m x 2 m print can be produced. I don't think there are enlargers for that type of prints for which the only solution is digital scanning and sending the file to a service. I watch the video of your darkroom
For the filter, Since I do not currently have any traditional film (Regular ilford hp5 is available in 11x14 sheets but it is $375 for 25 sheets), and do not plan to make any color negatives, so having the filter live inside the camera actually makes shooting more convenient. Good question about print size. My first response would be to simply stand firm on keeping the size the way it is. I don't have any issues with digital technologies, I use them a lot and of course did make high resolution scans for this video, but for my artwork I tent to want it to stay within what is possible with analog process. To me the direct connection between the end print, and the cameras on location is important. If I absolutely had to enlarge the negatives further, there are a few options. 1. I could turn this 11x14 camera into an enlarger by making a large light source and negative holder that attaches to the back of the camera, which stays upright and points at the wall. Then a large roll of darkroom paper is cut and a large print made on the wall, this is called mural printing and has been used to make extremely large darkroom prints. Another options would be to make a good contact print, then to take a high resolution image of it onto 4x5 film, or some other format that has more common enlargers, then make bigger prints traditionally.
@@richpence I saw the video of your work in the darkroom. The orthochromatic technique is interesting. As well as pointing the enlarger towards the wall for larger format prints, but are there sensitive large format papers? In 1975 I dabbled in b/w printing with the Durst enlarger but then gave up due to lack of time.
@@clabart There are still many large format papers available in both color and black and white. Cut sheets go up in size to 30 inches x 40 inches (75cm x 100cm) and rolls are available in a variety of widths, the biggest being 56 inches wide (142cm), normally with 100 foot lengths (30 meters)
That’s a good idea, it can be tricky to find filters for such a big filter diameter (95mm) but perhaps one of the big square filter kits makes an adapter to fit.
You can make those paper negatives positives, you know. 1) Develop but do NOT stop or fix, 2) Rinse 3) Still in the safelight, put in a bath of copper sulfate and table salt, about 15-20 grams of each per liter IIRC, this will bleach out the silver that's developed only. 4) Rinse 5) Bath of dilute ammonia, just straight up grocery store unscented or anything windex, lots of rocking and agitation, this washes away the bleached stuff. 6) Rinse 7) Expose to bring room lights for like 1 full minute 8) Develop again, and then fix etc as normal. Be sure to thoroughly wash away any and all ammoniacal silver, as it can become explosive if left to dry back into a powder in concentrated amounts in one place. I have no idea if this is okay for the environment or how to dispose of things properly, , probably not, I only tried it on a few pieces of paper and not as a regular process.
Thanks for the info! I have always been very interested in reversal processing of papers, and black and white films. I have even tried it a few times with a hydrogen peroxide 40% solution as the bleach. It did work, but the result was not great and stained the paper, and I was very put off by the harshness and toxicity of the chemistry. I have not heard of the Copper sulfide bleach, I will look into it. From the sound of it though it does not sound like a very pleasant process from a chemical safety and environmental standpoint (explosive parts and all! haha) I do often think about trying it again, but I do also really appreciate the usefulness of having the p[aper negatives, at least for these kinds of landscapes, being able to make contact prints with dodging and burning and such is really useful. Of course one of the reasons I designed the camera to reach 1;1 scale is so that I could potentially photograph one of the negatives directly like a process copy camera and make a positive that way.


really makes u appreciate early photography of landscapes
The effort of the early days is really something impressive!
I’ve been looking for a video exactly like this for months now…. Thank you
I'm glad it can be helpful, thanks for watching!
As you stop down more, you'll get less vignetting. It's pretty standard to end up at f/45 - f/64 with an 11x14 camera doing landscapes. Yep, there will likely be wind movement of foliage. Otherwise, you might consider a 480mm lens. You can save money by getting something like an APO Nikkor in a barrel. At 1 second exposures, it's not hard to use a lens cap for exposure. A Nikon 450m would also be a great option.
Great to know, thanks! It seems like researching further the 360 is really only just covering 11x14 wide open with basically no movements, but stopping down gives a bit more room. I will keep this in mind, and the shots at Zion that I show are between f11,18, so I was helping myself a little, but am interested to see what those very small apertures can give!
@@richpence Really great job on the camera and video, btw!
@@peterdesmidt8742 thanks very much!
This is outstanding! Thank you for sharing your build.
@@HonJazzz thanks very much for watching!
Extremely impressive and elegantly designed on many levels. It could have looked like a janky mess with all the outside-of-intended-pupose parts, but you made it look cohesive. Well perhaps the handle is a little crude looking, but that’s just nipicking. The green bellows and walnut compliment each other in color. It looks like total success to me. Even the bottom with all the bits packed inside is aesthetically pleasing. Nice.
Thanks very much! I had considered getting some kind of an Amplifier Handle, which would be leather and look a little nicer. But I liked the secure feel of the solid metal one in my hand, plus it was already at the hardware store so cheaper and no waiting time!
@@richpence You also get infinity bonus points for making your own bellows. I had notions of building one myself once but when I saw the process I got cold feet. I’ve always wanted a solution to the darkcloth problem and I thought that a bellows with goggles on the end would be cool. Blocking ALL light but without encasing yourself in a hot blanket. I never built it but its one of those things that nags at my mind.
Thanks very much! I actually just filmed a tutorial of the steps for making bellows, I’m hoping it can make the process less intimidating! I am still going to film parts for designing and layout, and then for copying and making fresh bellows from existing broken ones.
Less than 5 minutes into your video and so impressed by your simple built-in tripod approach, I had to comment. I had thought of doing something like this, motivated by wanting to avoid lugging a tripod and inspired by the old wood field cameras that have legs that attach to a large diameter circular opening in the camera base. The "modern" tripod's weak point is that the camera's entire load is clamped on a very small surface area. Why not use the width of the camera to spread that load around? I had no clear idea how I would design this. Now I know. Your solution is so practical, economical and flexible. Now back to the video.
@@iseolake thanks so much! Yes I knew the camera would be very heavy so I really wanted to avoid a tripod to lug around as well! Also the 11x14 base was just big enough to fit the smallest of the monopods I could find. I appreciate you watching!
Congrats on the camera. As an impoverished student I once built a 6cm x 9cm view camera incuding the bellows! Boy so stiff. Crazy project but it worked. Film holders in that size existed then. Mucked around then with 6.5 x8.5 inch on an old Thorton Picard body. Beautiful antique wooden film holders that I still have. My last wooden 4x5 sits on a shelf gathering dust. I'm tempted (just a little) to try it again with paper negs. About ground glass: I ground my own using an abrasive powder that was used to hone microtome knives that are used to cut histopathogical tissue sections. Two bits of glass of the correct chosen size (you get a spare in this process!) Some powder between them, water to make a thin slurry annd rub them against each other on a firm flat surface (larger heavy glass IIRC is ideal) with firm pressure until the whole surface is ground to taste. Replenish the slurry as required. Tip #2: a small central spot of grease or oil on the ground face clears the glass to allow critical focus on what is the aerial image. Thanks for the vid.
Awesome to hear about your homemade cameras! Yes I am familiar with the hand grinding process for ground glass, I have done it a few times before for 4x5 cameras, it works very well, and if needed to be sourced locally one can use fine valve grinding compound from an auto parts store, it is a similar ultra fine abrasive powder but pre suspended in a paste form and handy tube. Though these days, I am really a fan of frosted or even hand ground acrylic, with a fresnel lens added it is very bright, and the main advantage is it will not break and shatter and cut up your bellows when it is eventually dropped or hit with something.
using all those arca parts is genius!
Thanks very much! I hope it can make the idea of building cameras much less daunting for anyone interested!
Love the ingenuity! The finished camera and the pictures taken with it are beautiful!
Thank you very much!
Outstanding build. I like your use of that standard photo cage hardware.
Thank you for watching!
@@richpence I made a 4x5 Tachihara copy about 1995. Fun project. Good on you.
Genius!!! Great woodwork and solution finding
Thanks very much!
As I've toyed several times with the idea of building my own 11x14, I'm awe struck by the elegant, yet, simple design of your camera. Just beautiful! Now you've got me thinking, again... Thanks so much for sharing this project.
I hope you will make one! Maybe if there is enough of us they will lower the price of film haha!
I love your appreciation of quality. This if the first video of yours I've seen but I can tell the amount of love and consideration you've put into the construction of this lovely camera. It reminds me of working with my grandpa in his wood shop, making everything to not only complete it's task but to look and feel good doing it. You've inspired me with soo many ideas in both my photography and camera construction, I'd never considered making my own large format camera simply for what I thought was a more extreme cost. Thank you for sharing such an amazing project, I can't wait to see more videos from you.
Thank you very much! please subscribe if you'd like to keep up to date on my projects. In the next month I am hoping to get my 4x5 DIY plans and video out, my goal is for anyone to be able to make a 4x5 camera for $200 or less. I am even working on a super simple and easy to source lens.
This was an incredibly well put together video. I've been tinkering with moving into large format for a little while and your use of the off the shelf parts is brilliant. Obviously there are tradeoffs, but you explain them well and I'm more motivated to build my own.
I liked and subscribed because I'm very interested in the video you teased about the accessible DIY 4x5 camera (seems more approachable for me getting into large format that 11x14).
Thanks very much for subscribing! Yes 4x5 is a great way to get into large format, and I am very excited about the 4x5 camera project, and am hoping to get it done in less than a month.
@@richpence Hey Rich! Just checking to see if you have an ETA on that next video? I just got a LF lens in the mail today and I'm trying to decide what approach I'll take on the camera build for it. Thanks!
@@DannyZawacki Hi there! Teaching / school has started back up so I am slowing down a bit. The next video will be a bellows tutorial, and hoping that will be done in the next few weeks. Getting time to get my 4x5 design together will likely not happen much until mid October or so.
@@richpence makes sense! I appreciate the update.
@@DannyZawacki Can I ask which lens you have, and what kind of camera you are interested to build? I may be able to offer some advice. If you want a very simple camera to just start making some photos with, I'd recommend taking a look at Morten Kolve's WillTravel 4x5 camera. it's all 3d printed and no movements, but via his Ebay store the camera, fit to your lens, is around $180, he also offers his 3d files totally free if you want to print or order prints yourself. It's a great simple camera to just start shooting on.
You really nailed down the simplicity, usability and still have good look! Looking forward and I hope there will be detailed videos about each part.
Now when everybody are trying "vintage" lenses with 16-24 Mpx sensors squishing more vintage juice out of them ( I've also done that - but this did not fill the void ) . Having such camera will create images that will be totally out of range for digital photography for many years ( and still be in very affordable price! ).
Have You tried convert such camera to the dark room enlarger - with the the DIY strong light source. THANKS!!!
Hi! Thanks for all the compliments! About the enlarger, I actually do plan to make this camera into some kind of enlarger someday with a large light source. But if you look at the section in this video where I show the 4x5 camera that I built, I have actually turned that camera into an enlarger and it worked quite well. In the Ansel Adams video I made last year, there is a section in it about darkroom light sources and I show the kind of light source that I used to do that, I’ll keep it in mind for future videos!
The way you emphasize the simplicity of using off the shelf parts is wonderful. Having your tripod incorporated into the design must save another several pounds. If you could source carbon fiber fittings you could save on weight, but the cost would be higher. Great job and a very nice descriptive video.
As a student, currently and in the past, I never had the kind of money to own “dream cameras”, like Gibellini and Chamonix view cameras, leicas, Hasselblad X-Pans, so I would try and build them myself. These days, I hope to make the kinds of videos and camera designs that a young me would see and be super jazzed to be able to easily gather the parts, make their own designs, and make a camera over a weekend or quiet summer.
I would love to have custom built and designed every piece, it could certainly be a lot lighter, but I also am a sucker for the speed of getting off the shelf stuff, and also the promise of being able to replace anything easily, or modify for other needs, and start from that design principle. For example, this camera is really just the folding box, and a front standard glued onto bellows, the rest can all be easily removed. If needed to lighten it, I could just make a single frame with an arca clamp to put the front standard on and skip all the movements.
I use the same loupe for my monorail 4x5, a fantastic cheap alternative to the photography specific ones that cost a surprising amount. Awesome video, really cool project
@@assortedwhatnot3282 I have used many of the Carson loupes and I find them to work great! Thanks very much for watching!
Awsome job both with the camera and the tutorial. Thank you very much for sharing your project and experience.
Thanks very much for watching!
Nice job. Will be waiting for new tutorials.
Thanks
I have more free time in the summer so I am looking forward to put out more videos soon!
Congratulations. Excellent work. Thank you for sharing.
@@franzscaramelli2651 thank you for watching!
Wow! What a fantastic piece of engineering!
Thanks very much!
I really enjoyed your video and I admire your unique approach to camera building ! 🙂
Thank you, I really appreciate it!
@@richpence I posted a link to your video on the Large Format Photography Forum too. I hope you're cool with that! 🙂
@@seanmac5507 of course, thanks very much, I appreciate it!
Awesome content! I work on my first large format camera and you give me so much inspiration ! I ll share my ideas too! Thank you
Great! I hope it goes well and thank you for watching!
This is wonderful. Look forward to seeing what you come up with next.
Thanks very much!
Wow! An abandoned gas station would look great through this! (I jest)
Nice to see it all complete and great work on the video!
haha thanks! I'll for sure have to get a Pro Mist filter or maybe some Vaseline and expired color film. Will have to do a Caffenol/dr. pepper film soup and double cross process.
Awesome job! I saw your post on FB and forgot about the project. I just so happened to chance upon this video while scrolling.
I have that same lens, but have only ever used it for 4x5. It’s so cool to see it reach its maximum potential on 11x14
I am VERY excited about the DIY 4x5 video you mentioned towards the end. I had a sort of “d’oh!” moment when you went over the individual components that make up your camera; how had I never thought to do that before?
Anyway, nice work! Looking forward to seeing more of what you’re doing
+1 to your wife as well. There are many cool projects that do/don’t exist largely due to the support (or lack thereof) of friends and family.
Thanks very much for watching! Yes I am very grateful to have a supportive wife and friends! I have been really enjoying the lens, and a few days ago I sat down and etched in all the centering marks and it turns out I have been putting the lens with a slight bit of rise from what I thought was centered, there is plenty of coverage.
I was just shooting on my original homemade 4x5 yesterday, testing a diy large format lens I’m working on. And seeing all the places I can improve on the new one has gotten me excited to keep working on it! It will be mainly 3D printed then added onto the base parts I showed. But for those who don’t have a 3D printer I am looking into various online printing companies, and want to keep the price of ordered parts around $60 or less. The ground glass (including a fresnel) will be sourced and bellows will be made from material. And I’m hoping for the camera with ordered 3D prints to still be less than $200.
What a fantastic project. It must have been incredibly gratifying to bring to fruition.
I’m really happy with the result!
I'm so interested. Thank you for all ideas!
Thanks for watching! I would love to see more big cameras in the world!
Awesome detailed video! I saw your post on a Facebook page a while back about this camera, so cool seeing a video about it!
I was in Zion with my 4x5 last month and I’m working on my own video about my photos from there
Awesome! I’m looking forward to your video!
Amazing! Beautiful work! And thanks for the in-depth demonstration!
Thank you for watching!
Dang, super cool man! Looking forward to the 4x5 video.
Thanks very much! Today I am sitting down to work out much more of the design of it!
Incredible! I just found my new project! What you’ve done is really impressive. Can’t wait to watch more of your vids
Also that list you’ve provided is gold!! I’d love to know more about the bellows. When do you think that video might come out?? 🎉
I would love to see a few videos of you using this camera in more places, circumstances, etc, and showing your progress learning to get the best photos out of it.
I’ll try to do that, thanks!
That was inspiring. Earlier this year I was talking myself into making an 810 in the Chamonix Alpinist style for backpacking. A car-portable easel style rig seems much more attainable for a "first go". Tons of great information and insight here. Utilizing the arca plates is genius: way more attainable than trying to fabricate custom pieces. Great stuff!
Awesome! Thanks very much for watching. I hope you try and build your own camera! Maybe try actually just using a box field panting easel, looking at my Wife’s I believe it could be turned into an 8x10. There are several on Amazon for $80-$160, you’d then have a folding box on legs, to reinforce, add arca for movements, bellows, and figuring out how to route and make the spring back. Maybe easier to just do all from scratch.
Love this! Really cleverly put together and the wood looks beautiful!
Thanks very much for the compliments! I recently moved to Arizona / western US from the Eastern US, and I’m amazed at the nice hardwood selections you can find here even in Home Depot.
@@richpence Very cool!
While watching, I had an idea for an "upgrade", for connecting the dark cloth to the camera. Instead of using the clamps, perhaps either of these two options work (and leave the need to carry clamps)
1. Velcro. Having it stitched onto the cloth, with the other parts on the wooden frame. The only downside would be the noise of taking the velcro off (might be an issue in nature)
2. Metal rings on the dark cloth, that you can hook on little latches on the wooden frame
@@MickBenjamins good ideas! I like the metal hook one, Velcro to me is just not a very attractive material compared to the rest of the camera. I think what maybe I would like is some fabric strips with riveted snap buttons at the top corners inside the box since I am considering a similar method for making some adjustable straps for the bellows droop issue.
@@richpence Very cool! Looking forward to future updates on this :-)
Very nice video !
Thanks very much!
Very cool! I’ve been debating trying to make a 4x5 pinhole camera and this might inspire me to actually do it lol. Great job!
Amazing! I wanna get people building as many cameras as they can!
Fantastic video, very inspiring! Glad it came up in my recommendations, keep up the good work! Cheers from Sweden!
Thank you very much for watching!
This was one of the coolest videos I have ever seen... super cool. Cannot wait for the 4x5 video!
@@ry1sfly thanks for watching! I’m working to make sure the design will good!
I look forward to seeing you build the 4x5; I have a hankering to build a 8x10 using your approach.
I’d be interested to see it! The use of those off the shelf arca parts really lets you be more imaginative in your design. The integrated legs are my favorite part of my camera, but for an 8x10 the would be tough to fit the lens inside.
this is so damn cool! great work!
Thank you!
Thank you for sharing. This has been a goal to build my own camera. Thank you for the review and your work on sharing your build
@@bonnevillegarage thanks for watching! I hope this can be useful for your own build!
@richpence do you have any video close-up photos of your back frame and spring plate?
@@bonnevillegarage Yes I have some more closeup photos and behind the scenes of the building. If you are on Facebook, join the Large Format Photography and Handmade Film Camera groups. I have posted many photos about this camera. Also if you are on instagram my username is Richpence like my youtube channel. I have posted more photos about this camera, but also you can feel free to send me a message asking any specific questions and I can take more photos of parts of the camera.
@richpence thank you again for sharing such amazing talent
It would be interesting to take pin-hole images with this format.😊
@@johnbowyer6902 pinhole would be a quite interesting project for a big camera! The design could be a lot more simple and compact.
Really cool and I'm really curious on that 4x5
I am excited for it and working on it right now, it will involve some 3d printing, but that is something that anyone without a printer can send off to various companies online to have prints made for them. The rest of the parts will be collected from amazon, and the bellows made by the user, my goal is for the whole camera to be under $200 total (potentially including a super simple lens I am working on)
So cool! Great work on the camera and the images!
You may have already figured out the lens coverage question, but if not, I did a little digging out of curiosity.
According to the lens data provided by Nikon, the 360 will cover 415mm at f6.5 which is just shy of 420mm, which is the diagonal of 11x14. In your video, it appears that you may have had a little bit of front rise, which could account for the clipped corners.
It's also worth noting that the data also notes that the same lens covers 494mm at f22. So, stopping down will give you more room to breathe. I hope this is helpful. Thanks for sharing your work on RUclips!
Thanks so much for the info! I actually had a pretty significant amount of rise for some shots, and those were between f11 and f18, so that explains it! Great to know. I will leave the wider apertures for portraits or still life with little movements (the longer lens distance should help with the coverage) and will stop down more for landscapes. What I really need to do as well is to really accurately measure out when the front standard is exactly centered and note / etch marks for setting up the camera to perfect center.
@@richpence Right on man! I bet the prints look amazing in person. There is just nothing better than ultra fine detail from a big format like that.
@@ArthurFellig thanks! And yes as long as I can keep the dust out of my contact prints!
With regard to vignetting, keep in mind that infinity focus creates the smallest image circle because the front standard is closest to the rear standard at that distance. The closer you are to the subject, the greater the image circle will be. You may experiment with not focussing all the way to infinity and stopping down to bring the picture into focus. I don't know how much extra coverage that might create. Also, be very conscientious with checking that your lens is centered. Any movements will exacerbate vignetting.
Thanks for the tips! Yes image centering was actually my biggest issue here, I had started with the lens not centered, which a couple days ago I actually measured and etched the rails so now I start perfectly centered. Stopping down more in general will help, at f22 or more I should be able to get a good 30mm of movement from center safely.
This is insanity!!! Congratulation to this masterpiece of a camera
Thanks very much! I hope I can inspire others to make their own dream cameras!
Dude... you are on another level... seriously impressive... I now have to go rebuild the P.O.S. 12x12 .... my mind is spinning ... thank you soo much for the effort in making and sharing this video...
Thank you for watching! Glad I could inspire a new project, haha
"Boo!" - cue micro jump scare 😅This is an epic project
Haha sorry for the scare, thanks for watching!
Great attitude and delivery.
Well worth watching!
I’m glad you enjoyed!
Really interesting video and excellent work. A really interesting and different approach to building/assembling a LF camera. As soon as I saw it I wondered how you would produce the bellows and front standard. It was a complete surprise how you built the FS. Would never have occurred to me but then I am no way an engineer. The bellows ? Respect ! I'd have wimped out and ordered a set. Great work though and an excellent video !
Thanks very much for watching! And there may be hope yet, I am making good progress on a bellows video, showing the full process from designing to building.
What a phenomenal video!
Thanks very much for watching!
This is labour of love... Well done!!
@@wichersham thank you very much!
Nicely done thanks for sharing
Thank you for watching!
What a great camera. I would love to build one for myself. This is well thought out and I love how portable it is. Any plans to share plans/drawings?
I’m happy to answer any questions you may have, and measure out and explain how I worked, but I actually do not have any drawings or plans because I did not make any. When building in wood, I always measure everything off of the parts I have in front of me. For cameras it is a balance between the known exact parts that are critical, and then designing fluidly around those to make everything work. The most crucial sized parts are the exact dimension of the film holder, and then building the ground glass frame and the spring back to perfectly match and fit. The same goes for any lens mount. Then I gathered all of the off the shelf arca rail parts, and the rest of the design was just measuring to what felt like it would fit best for all of those parts to work and collapse into itself. But the parts you collect and find may be different from the parts I have made. Maybe some day I will draw up exact plans of stuff like the spring back, but also I am not totally sure that the design as I have made it is exactly the best possible for expecting others to make from plans, it could likely be simplified and optimized for more people to be able to make. That’s kind of why I didn’t make a really strict step by step of the building for this video, since I haven’t optimized the recipe and steps to be able to show them exactly, there was a lot of trial and error for the making of this camera.
I can't be the only one wondering whether you're taking orders. A very clever design.
Haha I have gotten a few questions about that. For now this one is the one and only from me, I’m in Grad school so have no extra time for taking orders. But maybe someday I will open up to some orders. My main goal is to give everyone as much as I can for them to built their own cameras!
Thank you for your video!
Apologies for the long-winded and poorly written comment... :P
I recently made myself an 8x10 camera, and it was fascinating seeing similarities and differences in your design.
The idea behind my camera was primarily cost reduction.
I like your use of off-the-shelf Arca hardware for your front standard; makes the camera behave more similar to a traditional view camera. I see no issue in using a sliding focus VS. a rack and pinion.
I agree wholy on your sentiments of the bellows and film holder situation being the most difficult.
Because of my stubborn cheapness, I made my own film holder instead of buying one. It functions, but is a rough affair, and I hope to remake it using a router.
It's impressive you made a tapered bellows! Mine is square. I also went with a blackout curtain material (fabric) for the exterior and have it bonded with a black fabric for the interior using fusible webbing.
I am very interested to hear more about your blackout material, please do a video!
Have you thought of making your own ground glass, or would it be too fragile and heavy for your purpose? I found it to be quite simple and allowed for fine-tuning of the ground glass texture/granuality.
I'm curious if you know what focal length the fresnel screen should optimally be, I have some but not attached. In the future I hope to make a condenser lens focusing screen like what may be found on some SLR cameras (impractical but it'd make me happy)
Your choice to use an existing large format lens is smart. My camera has an old Beseler 14" f3.5 projector lens, and I adore its rendering but despise the lack of a shutter and iris. I plan on implementing a Waterhouse stop and Packard ideal shutter in future.
Funny that we did the exact same thing to attach the rotating back! Some threaded inserts and some knobs works well enough!
Good idea to use the monopod legs!
Mine is currently a legless slug, but I plan on adding 8 legs >:D It's rear and front standard are only attached using the bellows, so I need each to have their own adjustable legs.
Thank you again for the video!
Hey thanks so much! I really appreciate hearing about your camera! I'll try and answer each of your points.
I have found the push pull focus to work totally fine, it is almost surprising how much fine control you can gain just with your fingers.
for film holders, One of my other design ideas behind buying (at least one if you can) standard holder really is important so that you can have an example of the "standard" international holder size. I was surprised to learn that 11x14 actually does have a recognized standard size, so it was important to me to be able to build my camera to fit that standard. For your 8x10, it may be a good idea to get at least one standard holder, even if a kind of old or beat up one, so that you know your camera can use other such standard holders when you can get them. Luckily 8x10 holder are a bit more available and easier to find, and having an example of construction and materials is much easier with a hands on example.
About the Bellows, I've also made some using the white blackout curtain liner material. I like that it has a white appearance, but I found it ended up quite thick. I will be working on the video in the next few weeks! I have a few projects that are needing many sets of bellows so I will be able to get the video done soon. I really only have the free time to work on videos like this during the summer as I am currently in Graduate school for my Masters in Fine Art.
I have made my own ground glass a couple of times for 4x5 cameras, and you are right about the niceness of being able to fine tune, but for the 11x14 being so big I really did not want to take the risk of glass that big breaking. I really like the security of the acrylic. Also the price and time saving is hard to beat, for example for the 4x5 design I am working on, I want to remove as many obstacles as possible for people making their own, so simply ordering a piece of acrylic and some of the handheld office Fresnel magnifiers for $15 total is hard to beat, and that is enough for 4 sets of ground glass, which I will experiment with carefully sanding the acrylic further with grinding compound or sandpaper.
Speaking of the Fresnel lens, that is a great question, I don't know the focal length, I did not test and the listing does not say. I was just happy to find one big enough easily available for $30 on ebay!
I for sure splurged on the lens, but I set out knowing I would really be investing a lot of time into the camera, and hopefully a lot more in using it for all shooting situations. I had considered a few projector style lenses for around $200-400, and ultimately decided that the extra $300 for a modern nikkor in a great shutter (I think it's my most accurate leaf shutter in my collection) was more than worth it. However, a small teaser! for the DIY 4x5 plans I am modeling right now a super cheap lens design for simple scientific experiment double convex lenses available on amazon for around $15, they are a bit soft on the edges, but they do provide a bright and sharp center. I will design them with a simple shutter and to 3d print to fit on a linhoff style lens board, they even sell the lenses at focal lengths of 200, 300, and 500mm in a set for $15 total.
The threaded insert back just makes more sense for simple DIY building! Much easier to design and build and easy to fix.
Wow sounds like you are making a spider! I may suggest 6 legs though, or really I'd suggest just getting 2 tripods. 4 legs will almost always wobble! but # legs never will! that's the advantage of three. Right now on amazon there are some very nice twist lock leg tripods for great prices, for example a 74 inch one by CAMBOFOTO is on sale for only $40. So unless you will be building your own legs, getting two tripods may be your best option.
Cheers!
@@richpenceThank you for your thorough response to my lengthy comment!
I'll try getting a hold of an 8x10 holder to compare.
The white blackout curtain is certainly on the thicker side, but not too much so. I'm able to get about 3.5 feet of bellows draw and it folds up down to about 4 inches. Yours seems much more compact.
I'll make sure to keep an eye on your channel for any upcoming videos. I understand it is difficult to find the time.
3 legs is certainly the sensible answer but, I'd like to try my 8 legged spider monster :P . I think I can make it self-leveling.
Thank you for your time!
@@Toad_Hugger best of luck on your camera!
Absolute genius! Bravo-Well Done! Thank you for sharing this!
Thank you very much for watching!
maravilloso trabajo! Una cámara preciosa.
¡Muchas gracias!
I've found some great camera bags at thrift stores too.
I have had a little bit of a thrift bug lately! Have been lucky to find some useful stuff!
thanks for the inspiration, i'll try to make my own now !
Awesome! I hope it goes great!
@@richpence well i hop it does ^^, i'm going for a 16x20...
@@John76220 awesome! I hope you share the results somewhere online!
Incredible build! Love the problem solving.
Thanks! That to me is the fun part!
Amazing work! Sourcing machined parts to fit the design is what has always hindered me from building my own camera. Love the information and that you shared all of it. Lovely camera!
Thanks very much! I hope this can give you the little push to make your own camera! I want to see more handmade cameras out in the world!
i would love to see this with color film
I would too! I’m fairly unlikely to shoot any though, it is around $30 per sheet, and most of all it is quite difficult to process at this size. Maybe someday! I think 8x10 film and cameras is more feasible for shooting large format color film. If you have not yet, check out Ben Horne’s RUclips channel, he shoots 8x10 color film almost exclusively.
Great job. Thank you.
Thank you for watching!
Thank you so much for your effort to create this video and build this wonderful camera. Its such an inspiration to slow down more while taking pictures.
Thanks very much for watching! I appreciate it!
You should definitely get a 6inch level for this camera. The longer the level the more accurate
Good idea! I will get one to add to the kit
@@richpence it’s a very cool build!
@@Mike_to_the_k thank you!
I am so glad that you made a video on this, I saw your original post on facebook and my jaw dropped! I will be respectfully ripping off the tripod base idea for my ULF camera in the future, but first the small cameras need to be made.
Thanks for watching! I’m glad it could be useful!
This was fascinating to watch. Your intuitive understanding of camera construction, understanding of how light travels and your ability to source material from just about anywhere make me want to go out and explore this for myself. I currently have both a Sinar and a Graflex 4x5. Thinking about making a hybrid build between both of these cameras with extra features designed into a single unit. So many things to think about. Your post processing skills and add in video explanations were very helpful. Subscribed and liked to assist you achieving 1000 subscribers 😊
Thanks so much for watching and for the compliments! I hope you do make or customize your cameras to work well for you, maybe save some money for more lenses or film along the way! I was just using my DIY 4x5 yesterday to test a diy large format lens I’m working on. But I realized that my old camera is not as great as it could be, so I’m looking forward to finishing my next project of the affordable 4x5 camera, so I’m hoping that will be out later this summer!
Yuo are brilliant, hats off
Thank you!
This is really helpful. Thanks!
You’re welcome, thanks for watching!
I need a big raise, because I need tools, workshop, dark room, money.
@@thomassicard3733 haha hopefully you can save at least a little bit doing it yourself!
Awesome video!
@@czelendzerii3985 thanks very much for watching!
Great design and nice work very inspiring thank you for sharing
Thank you for watching!
Amazing Build, and thanks for sharing your knowledge....
Thank you for watching!
Wow!!! That's incredible ❤
Thank you for watching!
New to large format, your video has helped tremendously!
Thanks very much! I hope you can build your own camera!
Trank you very much, beautiful work 👍
Thank you for watching!
Really really amazing job. Well done! You might already know this, but the Nikkor W 360mm has an image circle of about 494mm. On 11x14 this gives you roughly 1 inch of movement in any direction before vignetting occurs. I suspect excessive movemens may have caused the vignetting on your Zion image. Looking forward to more videos.
Thanks for watching! Yes that is correct, I was giving too much movement, but another problem is that I hadn’t yet really measured and etched the rails to know that I am starting from perfectly centered! Which I have done now, so now I will be starting from a better place.
Glad you got that sorted. Looking forward to what you can do with the camera.
@@renepirolt thanks very much!
Nice video ! Miss you buddy!
Thanks, man, I miss you too!
Nice work building your own ULF. It is well thought out and I love the built in tripod. You might find a larger dark cloth well work better especially when you are in a bright environment. Well done sir
Thanks very much! I have some bigger cloths I can use, but I like that the small one fits easily in the bag, and in the summertime heat it does not get as hot underneath. I know I can have white fabric on the outside, but I am in Phoenix AZ, so it does not help much in 110 degrees. I’ll take any kind of breeze I can get under the cloth! Plus the lens is quite bright at f6.5, so have been bright enough so far.
This is amazing stuff! awesome engineering as well! very nice!
Thank you very much!
This is a beautiful build! Look forward to the bellows and 4x5 videos in the future!
Thanks for sharing, subscribed!
Thanks very much for subscribing! I am excited to get those projects out by summers end!
So cool!
Thank you!
Awesome.. I'm just starting out with my 11x14 build and find this video very helpful. Although my planning is slightly different to yours I am curious what focal-length Fresnel lens you got?
Awesome, best of luck on your build! And I’m honestly not sure what the focal length is, it is not listed on any of the selling pages, and I didn’t think to measure it before installing in the camera. I can say that the one I got works very well. The options are quite limited, so I just went with one that looked right and was a good price available new. Searching for the 300x400mm or 320x400mm ones seem to yield similar results, and you could even reach out to the seller and have them cut you a custom one, I’m sure they could tell you the focal length.
Nice and interesting design. As far as fall off, I belive 450mm is the standard lens for a 11x14
Thanks for the comment! I simply got a little overzealous with the rise on my images, but you are correct. Larger formats always remind me that the diagonal mm measurement of any given film frame is the same as it's 'standard' lens. For example the diagonal of 135 film is 43mm, so most choose a standard between a 40. 45, or 50mm, and maybe a 35mm on the wide end, only Pentax has been brave enough to make a lens at the "true" standard focal length with their FA 43mm f1.9 Limited (I am a Pentax fan). But back on topic, the 450 is the standard lens because the diagonal of 11x14 is around 450mm, so as long as the lens can cover that it will be ok. The Nikkor w 360mm is wider, (Around the same as a 35mm focal length on 135 film) but the image circle is 495mm at infinity at f22, so it does cover. I just simply overstretched the rise and did not check the lens coverage carefully enough, the bigger format means that my spare 35mm or so of rise does not go as far as it would on say a 4x5 camera. Something to get used to, and I also really need to measure and calibrate / mark my rails to know when I am starting from exact center for full coverage.
Nice!!!
Thanks!
Respect et admiration. C'est fantastique!
Merci!
This looks so good. I'd be very intrested in a video about your process making contact prints from paper negatives
Thank you! I will see about making a video on that! I have actually made a video going over some more advanced contact printing processes in my Making Large Negatives in the darkroom Video that is already up if you'd like to take a look, it has lots of contact printing in the process.
Congratulations on the realisation of the optical bench! Looks like you're back in 1800! I have no experience of optical bench with large format film, but only with Hasselblad 500CM. I just remember that I got to see up close an optical bench (I don't remember if Linhof or Sinar or another brand) of a friend of mine in his photo studio. Impressive to notice the great detail and dynamics of the shadowed parts of your photos. For the filter, instead of having it internally, why not have a slide on the front optics so that you can also use other filters, red or blue? About the fall of light at the edges depends on the optics? For a larger format print than film how do you do it? Do you digitise the negative and then print on plotter? Anyway my compliments for the construction.
Thanks very much! I will try and answer your questions. For the filter, I worked with what I had available. I knew I would be using darkroom photographic paper as my negatives, so I had to use that specific filter type. Some also use regular yellow or orange filters for the film, but the issue is the size of my les. The Filter thread is 95mm, a odd and very large size, so filters are hard to find, and when you do find them, they are extremely expensive. My solution worked for what I need the camera to do, and the filter is always easy to remove in just a minute, and the filter is the exact best kind in my opinion for the negatives I am making. The paper itself is darkroom paper, so it is actually designed to not be sensitive to RED light at all, and inside of a camera it is extra sensitive to blue and UV light, so the filter is helpful. The filter will also work quite well on black and white film to darken a blue sky slightly. I would only really need to remove it for shooting color film or paper. Yes the lens light falloff is a matter of the lens I have, and giving too much movement up to see the mountains level. If the lens were to be centered and the whole camera tilted up it would cover the whole image. For prints I still make them in the darkroom! I sandwich a new sheet of paper under the face down negative and use an enlarger to shine light through the negative. This process is called "Contact Printing". If you look at my video "Making Analog Alternative Process Negatives in the Darkroom: Ortho Litho Film for Cyanotypes" You can see my darkroom and several versions of contact printing in action.
@@richpence Thanks for the reply. I know very well that square filters for large diameter lenses are expensive! On the other hand they have the convenience of removing or inserting without having to dismantle the optics. I have no experience with prints from very large format negatives but only 120 from Hasselblad. Yes, I had heard of the contact printing technique, but if they ask you, for an exhibition or for home furnishings, for a larger print than the negative, what do you do? I was curious to know having seen your very high quality negative from which, for example, a 2 m x 2 m print can be produced. I don't think there are enlargers for that type of prints for which the only solution is digital scanning and sending the file to a service. I watch the video of your darkroom
For the filter, Since I do not currently have any traditional film (Regular ilford hp5 is available in 11x14 sheets but it is $375 for 25 sheets), and do not plan to make any color negatives, so having the filter live inside the camera actually makes shooting more convenient. Good question about print size. My first response would be to simply stand firm on keeping the size the way it is. I don't have any issues with digital technologies, I use them a lot and of course did make high resolution scans for this video, but for my artwork I tent to want it to stay within what is possible with analog process. To me the direct connection between the end print, and the cameras on location is important. If I absolutely had to enlarge the negatives further, there are a few options. 1. I could turn this 11x14 camera into an enlarger by making a large light source and negative holder that attaches to the back of the camera, which stays upright and points at the wall. Then a large roll of darkroom paper is cut and a large print made on the wall, this is called mural printing and has been used to make extremely large darkroom prints. Another options would be to make a good contact print, then to take a high resolution image of it onto 4x5 film, or some other format that has more common enlargers, then make bigger prints traditionally.
@@richpence I saw the video of your work in the darkroom. The orthochromatic technique is interesting. As well as pointing the enlarger towards the wall for larger format prints, but are there sensitive large format papers? In 1975 I dabbled in b/w printing with the Durst enlarger but then gave up due to lack of time.
@@clabart There are still many large format papers available in both color and black and white. Cut sheets go up in size to 30 inches x 40 inches (75cm x 100cm) and rolls are available in a variety of widths, the biggest being 56 inches wide (142cm), normally with 100 foot lengths (30 meters)
Great built. I like how U use off the shelf parts
Thanks very much! Also I appreciate your projects on your channel, Great Work!
That was very cool! Looks like a fun camera to use.
@@just_eirik thanks very much! There is something gratifying about using cameras at these sizes!
Oh no, it's another hyper specific niche of photography for my ADHD to fixate on 😂 well I guess I'd better get to designing one...
Haha I’m exactly the same way 😂
You should try some type of graduated ND filter to retain detail in the sky. I’d be interested in the results
That’s a good idea, it can be tricky to find filters for such a big filter diameter (95mm) but perhaps one of the big square filter kits makes an adapter to fit.
@@richpence that’s what I was thinking is just tape a big square one on there or something
Genius!
Thanks!
Very well done!
Thanks very much!
YES! = Very well explained.
Thanks very much!
I'd love a plan for a 6x17 bellow camera
Wouldn’t it make more sense to just buy or make a roll film back for 4x5 or 5x7 cameras?
@@richpence Of course we will need a film back, but I once saw a camera like this and it is flatter than a standard camera with an adjustment
You can make those paper negatives positives, you know. 1) Develop but do NOT stop or fix, 2) Rinse 3) Still in the safelight, put in a bath of copper sulfate and table salt, about 15-20 grams of each per liter IIRC, this will bleach out the silver that's developed only. 4) Rinse 5) Bath of dilute ammonia, just straight up grocery store unscented or anything windex, lots of rocking and agitation, this washes away the bleached stuff. 6) Rinse 7) Expose to bring room lights for like 1 full minute 8) Develop again, and then fix etc as normal. Be sure to thoroughly wash away any and all ammoniacal silver, as it can become explosive if left to dry back into a powder in concentrated amounts in one place. I have no idea if this is okay for the environment or how to dispose of things properly, , probably not, I only tried it on a few pieces of paper and not as a regular process.
Thanks for the info! I have always been very interested in reversal processing of papers, and black and white films. I have even tried it a few times with a hydrogen peroxide 40% solution as the bleach. It did work, but the result was not great and stained the paper, and I was very put off by the harshness and toxicity of the chemistry. I have not heard of the Copper sulfide bleach, I will look into it. From the sound of it though it does not sound like a very pleasant process from a chemical safety and environmental standpoint (explosive parts and all! haha) I do often think about trying it again, but I do also really appreciate the usefulness of having the p[aper negatives, at least for these kinds of landscapes, being able to make contact prints with dodging and burning and such is really useful. Of course one of the reasons I designed the camera to reach 1;1 scale is so that I could potentially photograph one of the negatives directly like a process copy camera and make a positive that way.
thanks can you consider to make 617 panoramic camera. again all the best to the family.