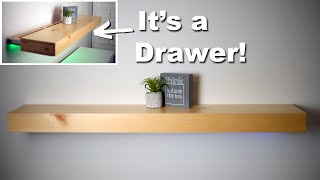
How to Make & Install Floating Shelves the REAL Way | DIY

HTML-код
- Опубликовано: 26 сен 2024
- There's a ton of fake news out there about how to install floating shelves and this video is going to clear some of that up.
There's people that install brackets onto the sheetrock (WRONG)❌
There's people that build out wooden framing encased in plywood (HARD)❌
Then there's people that install them directly onto the studs (CORRECT!)✅
We'll do that last one and I'll show you just how quick and easy it is.
Sheetrock is soft. If you install brackets directly on to the sheetrock - even if you hit a stud - you're going to get a wobbly shelf and it's only a matter of time.
Additionally, you need welded brackets. These aren't industrial strength but will hold your typically house hold items so these are the ones I went with.
-----------------------------------------
Tools Used:
⚒️⚙️🗜️🔦📐🔧🔨
Floating Shelf Brackets: amzn.to/3gU0xCO
Hole Center Guide Tool: amzn.to/339ZAyb
12" Drill Bit x 1/2": amzn.to/2Sr9b1p
Epoxy (if needed): amzn.to/33gqgNu
Polyurethane Satin: (not available online)
Coffee Mugs: amzn.to/3f6tBVh
Plates and Bowls: amzn.to/3eUJTQG
Wine Glasses: amzn.to/2SjO3df
Planter: amzn.to/3eRK2V9
Glasses (newer): amzn.to/3b18uCf
Dewalt Sander: amzn.to/3eQzNAu
Dewalt Impact Driver: amzn.to/2RjQDj2
Dewalt Multi-tool: amzn.to/3vCBlEW
#FloatingShelf #HowTo #KitchenRemodel
***********************************
Kelly Concepts is a participant in the Amazon Services LLC Associates Program, an affiliate advertising program designed to provide a means for sites to earn advertising fees by advertising and linking to Amazon.com
DON'T CLICK THIS:
www.youtube.com....


That, my friend, is a push stick. Normally used to cut pieces on a table saw. It helps to keep your fingers away from the blade.
Exactly the information and directions I needed. Thanks for posting your video.
I have been obsessed with reading and watching videos about floating shelves. I really want to install some in a weird small corner in our kitchen that I believe these will be perfect to make it useful! This video makes it look easier than some of the other ones I have seen! Thanks for sharing!
Could u use the same drywall and just predrill holes on it to put the drywall back to cover the hole?
This was an amazingly thorough video! I like that you cut through to the stud, so smart! Thanks
The "drill jig" you found in the basement is actually a push stick for a table saw. Lol.
Amazing video. Looking to do the exact same thing with some 8/4 ash. Every rod I’ve found on Amazon has the predrilled holes spaced out further than 1.5”, only allowing for one screw to hit the stud. Didn’t think of cutting the sheet rock and flipping it vertical. Genius! 🤙🏼
Same here, a link to these brackets would be amazing!!
One tip. You cut out a perfect rectangle with the oscillating tool. Just drill a hole in it the size of the rod and you can slip it on and back into place. May have to trim the thickness to account for the bracket behind the drywall…..but you have an oscillating tool.
Ha, I was just about to post this exact same comment. Works like a charm.
I was really impressed with your tips! Everything you did was what I had in mind! I am doing the same thing in my kitchen. However i will be placing it over a subway backsplash. The drywall cut outs were clutch, levelling the bars, stepping up bit sizes etc! Only thing i saw that made me nervous was you drilling in the rain! Hope they didn’t get too wet 😅 This video gives me some momentum to give me shelves a go! Thanks.
Very clear. Great job. Thanks buddy. Cheers from France 🇫🇷 😊
Love seeing baby girl watching daddy sand!
Wow beautiful. I like video ❤
thanks great tips I was trying to resses the bracket into the wood shelf and kept having blow out on the edges.
Great video !! thanks !!
Great video.
Just a thought.... As long as your shelving wood is at least 1/8" inch wider (min 1-1/4") than the 1'-1/8" (short side) of the bracket, why not rotate the bracket 90 degrees and drill chamfer a third hole towards the middle on the opposite side. More work on the front end, but I don't mind metal, but steer away from drywall repairs if I can. I often find the repainting does not always match the original color nowadays.
Would this approach be the same for metal studs? Most videos is based on wooden studs, leaving out metal suds. Thank you.
Great diy tip, thank you! Where did you get the true 2x10 poplar lumbers?
i'm guessing they got the Poplar from a hardwood lumber yard. Probably 8/4 hardwood lumber
Home Depot carries it
I want to know as well. I don’t see this from Home depot
Thank you so much!! Looks beautiful.
Great tutorial!
Thank you!!
NICE Work !!!!!
👍Fantastic! Great job!
Good video, but you might want to keep the little one away from the fine dust
I thought the same thing. That drywall dust is airborne big time. I know, as I am a drywall expert and it can't be good for new borne babies for sure!! Safety First!
Absolutely wonderful video!!!
Oh, great. I've designed a mini library in my bedroom but it has to be done like a floating shelves, so I need to install a powerful shelve to put books on it. It should be strong enough to hold the weight of the books. This way of installment could do, right?
Good Job!
Love this. I have a small corner and no coat closet so I'm hoping to install some floating shelves. We are talking about 16x12 and in a corner. I don't think I can reasonably do two brackets on one wall. How do I handle the corner. It's a long term rental and a high traffic area.
Good job
Thanks for sharing! I wanted to use your affiliate links, but those mounting brackets are no longer available on Amazon. Thought you may want to update your link. Thanks again!
They have brackets? I just use 3/8" All thread
Y no 10mm metal screw rods, directly into the studs?
What size screws did you use to mount the brackets?
every time I see this I am like wow if only I had wood studs and not metal studs
Why would this not work with metal studs? You would just need to use self-tapping screws for metal applications.
Hello. Great video thanks! Other than Home Depot or Lowes, where would I find these true 2” boards? Hardware stores aren’t true 2” thick. Plus I’m only finding Doulas Fir.
Search for a lumberyard around your area on Google and call to make sure they carry more than just construction lumber. My closest one is about 40 min away outside of town. Lowe's did just start carrying some cool 2" thick live wood edge boards at all the stores near me in NC. Good luck!
How can this be achieved if you have cement blocks aka cmu
Nice video. Where did you find the wood?
You drilled out the final holes in the timber with a masonry bit. What do you need to do to make sure this works properly, I have tried in the past but been unimpressed with the result...
the best thing to do would be to use an actual drill guide to keep the holes straight. However, small imperfections with the holes actually make the shelf more snug when pushing it on the mounting brackets.
Nice but often we don't have 2 or more studs behind our shelf and must use wallboard type anchor options in conjunction with stud
Can you do this on a firewall?
Uhm 😐 European here 👋🏼… we usually don’t have dry walls that we can cut through… any tips ?
oh yeah, I also bought floating shelves at a home depot, they're not as good as you showed.
I have never seen somewhat cut out the drywall but that is brilliant! So much easier than chiseling out the wood of the shelf! Way to think outside the box!!
How is that easier than chiseling the wood...?
@@jamesrichards2980 You could cut out drywall with a butterknife and little skill as opposed to owning and properly using a chisel.
You’ve never seen it because it’s WRONG 😂
thanks for sharing 🎉
Where you get the popular wood.
Most lumberyards will have it. Called Poplar wood and its pretty common
so what's the point of cutting off the dry wall if you could just screw into the stud?
Eliminates drywall wobble from getting crushed
Didn't watch the video, huh? Drilling into the studs prevent wobble.
How do you think this would work in a laundry room?
I made this exact setup in my laundry room. 1 shelf holds a large bottle of bleach and detergent. Works just fine!
That’s not a drill bit guide 🤣🤣🤣🤣 that’s a push stick for a table saw.
Seems like he'd make a project out of changing a light bulb
If you have to cut sheetrock its ,the dusty way,
Since when is a drill guide a "hack"?
when it's really a homemade table saw push stick.
Why do people make something so easy look so hard. 🙄
because some things are better when they're built right.
You brought the baby at the worst possible time
During sanding
I would suggest deck screws or similar as sheetrock screws are extremely weak
I literally do not understand why you would put the floating shelf brackets inside the drywall like that. Why don't you just screw through the drywall, into the stud, and chisel out the back of the shelf?
1:40 in the video explains it
@BibleTalk101 watched it with sound off
lol here is more FAKE video do not do this !!
I ensure you this video is real. It is not your imagination 😆
Am I the only one that thinks he talks too much? I'm damn near uninterested before the work actually begins. Maybe try talking, hmm, let's see, while your working.
@BibleTalk101 what in the entire fuck are you rambling about bub?
I understand your logic, and although it makes some sense, I believe you’re totally wrong here.
You’re supposed to install any heavy load decor/home accessories over Sheetrock, but to a stud, like it’s always been done.
If your shelf is wobbly after installing the shelf over Sheetrock, but to a stud, you’re not using the correct hardware for the load.
It’s not the method that’s wrong, it’s the hardware. Best practice is to avoid making any additional/necessary holes through drywall in your space to prevent any more air leakage than you may already have.
Why didn't you use longer rods and drill the studs for them?
No cutting the drywall.
No patching and painting the drywall.
No screws.
Could have saved a lot of time.
Interesting, are you saying to just drill a long hole into the studs and use a long rod, rather than a rod with a bracket on the end?
That would actually work great if I stuck a little epoxy into the rod that goes into a stud. Good thinking, I've never seen that before.
@@KellyConcepts Epoxy? No adhesive of any kind is needed. How would anyone ever get it out? A friction fit will do quite nicely.
Don't over think things.
@@KellyConcepts take a look at this vid ruclips.net/video/BpS_MEHfgac/видео.html
There are standards for live wire in place but who know what is going through the stud. This method is good if you not sure what is going through the stud. That is my guess for not using long rod
@@runtime_engineer It's too high on the wall for any plumbing or electrical but every home improvement store has stud finders that also see these things.
Love the coffee cups for the open shelves. Glad they have nice sturdy shelves to sit on.
Those mugs turned out great and everyone will know which mug is theirs
Great, helpful video. Great job on the shelves. Thank you so much!
Thank you for your video on floating shelves. I was unsure what hard ware was up to par for heavy thick wood shelves. And your attention to detail is much appreciated. I'm about to hang some pretty heavy, short pieces of white oak as a place to hold my stereo components, stair stepped along a wall. Your video is my guide to doing just that. Many thanks. I couldn't help but notice at the end of your video that your child you were holding was watching every move you made. She/he (sorry, not sure which), is going to be a "do it your selfer like daddy! Again, many thanks.
where did you find actual 2" wood?!
At a real hardwood store that sells all kinds of specialty wood. Wood will range from $5/ft to like $40/ft+ depending how exotic you go. Poplar (like mine) and Walnut are a little more common and not super expensive.