etrailer | Trailer Brake Controller Installation - 2014 Dodge Grand Caravan 90885

HTML-код
- Опубликовано: 15 сен 2024
- Click for more info and reviews of this Tekonsha Trailer Brake Controller:
www.etrailer.c...
www.etrailer.com
Don’t forget to subscribe!
/ etrailertv
Full transcript: www.etrailer.c...
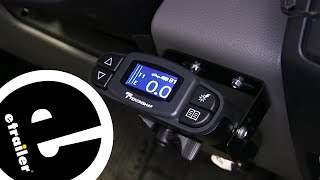
Today on our 2014 Dodge Grand Caravan. We're going to be installing the Tekonsha Prodigy P2 Trailer Brake Controller. Part number 90885. We're also going to be installing the universal installation kit for trailer brake controllers, part number ETBC7. Now here we have our brake controller, we have everything hooked up and you slide the manual override, the lever on the bottom we have an NC for showing that there's not a trailer connected. Now I'll go ahead and plug the trailer into the back. Now that we have a trailer plugged into the back, you can see that we have a C showing that it is connected.
The manual override here on the bottom here controls, here's the manual override switch, we have the roller knob here on the left side, which controls how much power the maximum amount will be given from zero up to 11, the blue button up here on the top right hand side is the boost feature or how aggressively the brakes will be applied. Now let's go ahead with our installation. To begin with, we're going to need to attach our 7 and 4-way plug here to the bracket that comes with the kit. Go ahead and slide it in position, line up the holes, we'll use the hardware that comes with the kid. The flat head machine screws slide it down through the, through the plug. Through the bracket on the back side we'll put this locking nut. Once our hardware is installed, we can go ahead and tighten it down.
Next we're going to go ahead and attach a universal mounting bracket. This is the tow ready universal mounting bracket, and it's part number 18136. This universal mounting bracket will allow us to attach our 7 and 4-way plug to the trailer receiver hitch itself. Now go ahead and line up our holes here. Use the hardware that comes with the long bracket kit, it's a phillips head machine screw. Go ahead and put that down through.
Again we have a locking nut. Go ahead and tighten everything down. Next we're going to go ahead and take our plug in bracket, we're going to secure it to the hitch using the hose clamp provided with the long bracket kit. Go ahead and put our bracket up into place, we'll then take the hose clamp, go up and around the hitch and back down through itself. Then go ahead and tighten down the hose clamp. Once we have our hose clamp tighten down, we can take a pair of tin snips and trim off the excess hose clamp. Next we're going to go ahead and take the grey duplex cable that comes with the ETBC7 kit, go ahead and strip some of the wire back.
We'll remove some of the great covering, exposing a black and white wire. Now we'll go ahead and take our duplex wire, come up around the hitch that we pull back down. Next we're going to need to strip back a little bit of wire from both the black and the white wire. We'll the be connecting the black wire with the black wire coming off of the 7-way plug. We'll be connecting the white wire with the blue wire coming off of the 7-way plug. We'll then go ahead and use a little bit electrical tape to tape up these two connections to help protect them from the elements. Next we're going to go ahead and take the four flat wiring that was previously installed on this vehicle only to connect it to the four flat plug on the backside of our 7-way connector. Now before we put the plug together, we're going to install a little dielectric grease on the connection, that's part number 11755. Can then go ahead and put the plug together. To make sure it stays nice and tight, we're going to go ahead and use a zip tie to help secure the plug as well. We can also go ahead and cut the cover off as we won't need that anymore. We'll also trim off the excess zip tie. Now we have a purple wire here with the butt connector on it. That's if you're going to hook up the reverse circuit to your 7-way plug. On our application today we're not going to do that. For now we're just going to take some electrical tape and tape up the connection. Next we'll go ahead and take our wire here, bundle it up a little. Go ahead and take a little tape just to help keep it together. We'll then going to take a piece of the half inch wire loom that comes with the kit. We're going to cut it to length here so then we can protect the wires. Now that we've got our piece cut, we can go ahead and install it on our wires. We'll then go ahead and use a little electrical tape to help make sure the wire loom stays in place. Go ahead and also tape our full flat wiring up a little bit. Next we'll go ahead and take our white wire here with the ring terminal, push that up and over the hitch so we can push all the wires up. Take a few zip ties to help secure i


Dude thank you for making this displayed install so easy. Do you have a video using the device because I'm not sure what to expect hauling
Note: When terminating the white and black wires to the circuit breakers under the hood, He call both circuit breakers 40 amp. Based on watching the install of the breakers and reading the labels: The 40 amp breaker is for brake control supply power and the 30 amp breaker is used for the auxiliary power to the 7 pin.
Thank you for bringing this to our attention. This kit will come with a 20, 30, and 40 amp circuit breakers.
www.etrailer.com/Accessories-and-Parts/etrailer/ETBC7.html
Why didn’t you use heat shrink?
Hello, I have a question, I bought this CURT 57674 connector, I already saw how to make the connections, but it is not clear to me where to connect the yellow cable (I know it is like a back up, like to charge the battery that I have in one camper and the power from the truck is useful for this) so where should the yellow cable in the truck be connected? thank you very much
The yellow wire is typically used for reverse lamps. To use that feature, you'll want to tap it into the reverse lamp circuit of the tow vehicle. The black wire would be used as the 12-V connection from the vehicle's battery to keep a trailer mounted battery topped off. Hope that helps!
www.etrailer.com/Trailer-Wiring/CURT/C57674.html
This is a great video but what about up north where salt spray hits everywhere - All those screws into raw sheet metal will rust right out!
Handyman hint: DO NOT secure, tape, or put the covering on your wires, until you test the lights and brakes. Been there, done that, had to remove everything to find out why my newly installed wiring was not working.
That's not a bad idea. It would save you a bit of time if you had to tear back into the wiring.
www.etrailer.com/bc-2014_Dodge_Grand+Caravan.htm
What does the black wire coming off of the 7 way do? Does it need to be hooked up? Or can I just run the blue wire and use one 40 amp fuse?
The black wire is the 12V that will provide your trailer with power to charge a battery or run interior lights.
www.etrailer.com/faq-wiring.aspx
www.etrailer.com/bc-2014_Dodge_Grand+Caravan.htm
Will this work for a 2016 Town and Country as well?
Just for those wondering, this will work on a 2016 Town & Country, I was able to do this installation just as the video shows.
@@GlennPearsonDIY was the brake wire the same white with the green stripe as it was in the video?
@@GlennPearsonDIY How long did this take you?
Jonny B I just finished a 2017 install and it was white with a green stripe. Double check though just to make sure. You can backprobe the connector at it’s not sealed, and there’s lots of room.
I would be cautious when splicing wires together. The yellow butt connectors he’s using are not weatherproof and neither is the electrical tape. There are good butt connectors that are shrunk by heat and have a wax seal inside that melts with the heat. Also the blue clip on connector he uses for the trailer brake controller red signal wire is garbage. Best practice is to cut the wire, splice in the red signal wire, and install a butt connector with the heat seal.
This is just a general heads up because this video is not best practice for climates like most of North America.
Benjamin Hansen Took me a solid day and a half, but that was the hitch, brake light wiring harness, trailer brake controller, and laying in a driveway without a hoist. I wouldn’t suggest it if you aren’t comfortable with electrical and mechanical. Should have a torque wrench to install the hitch. Also the rubber boot around the wire harness in the firewall is very hard to poke thru. An old school clothes hanger with a pointed end works well and is cheap.
Hose clamp technology.