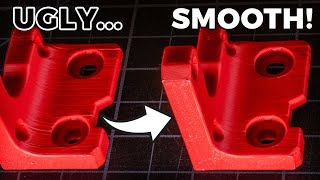
There;s another huge benefit to this slanted printing tyechnique, which you hinted at with mention of a textured finish. Now that NO SURFACE is printed on the bed, it's possible to be very creative with what you print on the surfaces; logos, ridges, grips, etc. all become possibilities.
This was exactly what I needed for a complex enclosure design, I was just resigning myself to having to print it in three pieces then saw this. Decided to give it a go and man did it work well! Thanks so much for taking the time to share this trick.
This is where 3D printing really shines: Have any PCB and _always_ get a case with the perfect mount points. And (traditional) case manufacturers seem to have noticed - prices seem to be coming down... Thank you for your videos (I watched the entire playlist over the last few days 🤓)!
I've just started 3d printing about a month ago. I was thinking that printing diagonally would solve lots of problems, but i hadn't seen a video of anyone doing it. Thanks for explaining this.
It will also introduce a lot of new problems. Another way to solve a lot of problems is to go composite. It can be as simple as just printing different parts each in the most beneficial orientation and then assembling em all together or not so simple as using different methods of manufacturing for different parts. This way does not add many new problems, but does make it much more complicated.
@@gouryyes I think you are right. These methods are not all or the other. For example the enclosure could be printed slanted but the lid be printed with ideal face facing down for a nice build plate texture.
I love this series. I don't intend to mass produce anything, but still use this as a design guide for my future projects to avoid failed prints and filament waste (both for ecological and financial reasons).
I do this trick with organic prints at times. As I have an FDM and an SLA printer, I have the mindset of Resin printing that uses the "angle" technique a lot. I've actually (with good success) set up resin prints, exported them, and then printed them with my FDM printer. Meaning I've used the supports generated from the Chitubox to print on my FDM printer. I have not delved into designing custom supports, but it definitely, inspired me to do so. This "fin" idea is really great!.
I made a box just like this one and printed it exactly that way. It was very good, the best thing in the world is to print at 45 degrees. Thanks for the video.
Since I saw this video printing on a slant, I've been using it for a lot of my projects that require strength. I mostly print PLA - my Ender 3 v2 (or me) struggles with PETG. All I can say is thank you so much for showing this. It really make so much sense.
I took your advice on this from past videos and printed a wall mounted headphones hanger I designed by cutting the back corner off off and printing at an angle. The base was about 45x60mm but now I was only printing about 8x60mm on the build plate. Gave me a super smooth surface on the rounded bottom where the headphones sit rather than lots of ledges from the layer lines. The front and back walls that keep the headphones centered printed fine even at 35-50 degree angles. Not the right approach for every part I think, but makes a lot of sense for many. Of course better to remove from the plate for production too.
I did not design a support, but it wasn't needed for such a small part. One of my considerations was also strengthening the two screw holes as you mentioned and making the front wall that keeps the headphones in place stronger by not making the layers perfectly vertical. Worked great the part is very strong despite being a couple mm thick at the front.
Great tip using the thin support on the back side. Can you please post the CAD model so we can have a closer look at the dimensions used in the supports?
I think that it is so cool how you guys Mass produce 3D printed parts for yourselves and others. And that in doing so, you run into all of these little interesting problems! That are very important to the 3D Printing community, and then you share those things you've learned with other people! It's really cool! It's the collective knowledge of the group, which works because of love.
With modern slicers, tree support doesn't cost much material or postproc for the vertical orientation. But diagonal still has lots of benefits. My favorite is that an assembly-relevant dimension of the part isn't dependent on bed offset (which isn't perfectly reproducible) or on layer height quantization.
You'll still end up with much better walls using this trick rather than printing them vertically with weak layer lines or horizontally with a 90 degree supported overhang.
Not being from the molding world, I had to listen to 3:22 about 50 times. Finally I think he said "sprue" so I looked it up and shazzam - I have learned an entirely new word.
Wow thank you for the great suggestion. I have a box that I was printing up and it was costing a lot only for support. This method allowed me to save 40% of material.
I just did this for a new print that took 7-8hrs. I was a bit nervous as I always used supports. The end result was amazing. 😃 I didn't have a 45' on the bottom edge of my print, it was a 90' point which proved fatal after the first few minutes. I proceeded to add a .04mm base around the point edge that easily shaved off post processing. Thanks for the tilt orientation tip, will be doing this much more often.
Thanks for this. I am doing a print this way tonight to see if it works for me. Even created a fin though I went all the way to the top with the fin and probably didn't need to do that watching this again.
I learned this by accident when printing the bridge of a stringed instrument on my Ender 3. I had to orient it diagonally with some support primitives to make it fit on the bed, and found that is ended up being one of the strongest objects I'd ever printed.
Great tip. It's worth considering though that this will also increase the mass and print time. You notice on the slicer that you get additional walls when you print on the diagonal to ensure vertical shell thickness during printing, all those purple walls. You could maybe add another 2 walls to the flat print for a faster print with similar weight and strength.
Great idea! I like how you keep the video shortened to the point. I don’t like watching videos that are so long that you don’t finish them sometimes. You’re the best!
i actually built and tested my second printer 5 minutes ago (Tronxy XX11, built from two Tronxy X1's - to make portal instead of arm), you guys are inspiration for me to do so, thank you very much!
@@KensCounselingCouch havent changed anything yet about firmware or even settings, so print quality is really bad. Basically mirrored all of it, so build volume is the same, but it is now more rigid and stable. Noise is the same, though, which is sad. That may be due to usage of cxy-v1 board with bad stepper drivers. That thing is ancient, but for its price (it was 1/3 of a price of anycubic kobra neo which i own), i wont complain. I would be changing plastic stock bed with glass one, then adding heated bed - need to figure out how to make it temperature resistant, acrylic bed base wont be good for 90 C bedtemp i need for PETG, for example. Lots of work to do, but it is quite fun project for me. Here are the photos of it and test print that came on sd card, both of it look lame, tbh. ( ibb.co/30DHG2n ibb.co/kHhTK0N )
Showing the strength difference of a 45 degree print in another video might be cool, with solid numbers and such. I've always thought 45 degree is probably a good general orientation for strength but no ones really done much research on it.
i just realized (3/4 of the way through) is the reason this works is the part is only at a 45 degree angle, which means, the part doesn't need "supports" to help it print, only a support to hold it up in place .. nice work.. !!
Yep, I have a box where this will work perfectly (but that I now print flat on the bed, which also works perfectly, but the slanted version should be stronger.)
was wondering if could use something similar on resin print...always found hard to make bases on resin...but this mm support between the fin and the piece would be the same as using regular automatic supports for resin, right? Hard to think on something that would give support but still be easy to break/separate from the piece after...
I second this, i came across a 3d print at work earlier this week, which i thought was molded, but assured it was 3d printed, this noise could well explain it and i would love to replicate at home
Great tutorial! Definitely will consider trying this. As for noize for outer shell: can you please share your parameters of fuzzy skin to try same? Looks really good 👍
This is awesome! I will try it in a smaller scale. Maybe i dont even need fins. If you turn everything 45° nothing needs to be supported. So simple but effective. Thank you!
So this is interesting. I have a conveyor belt 3D printer (CR-30) that inherently prints at a 45⁰ angle. I always thought of that as a negative. I think I'll try to design some stuff with that extra strength in mind.
Excellent. I particularly appreciate the designed-in supports concept. I will definitely design some things to print at an angle next time I am concerned about horizontal/vertical layer delamination.
The bit about built in supports was great. I have not yet tried it on my designs, but I can see the uses. Also, printing at an angle like this would likely be less prone to warping off of the table like a long part would.
Hi there Slant 3D. I've only recently started watching your videos, but am finding them informative. Particularly this one. I employed this support and printing technique to print a thin walled air duct that was essentially a 90 degree elbow. I was able to print it without any supports apart from the 45 degree custom support "spine". I did want to comment on your microphone. You appear to be using a Blue Yeti. The microphone pickup elements in this (there are 4) are oriented with their planes parallel to the microphone body axis. The way you have it positioned in the videos is with your voice hitting along the axis (such as is typically seen with normally hand held mics). You should be talking at it laterally, from the side to maximize pickup. Use the pattern knob and try out some positions. You might discover it sounds way better. Cheers!
Having printed for multiple years, and exposed to the internet for too long. I was really sceptical of this "miraculous" claim. But gave it a look. And it actually makes a lot of sense, most printers print happily at a 45 degree angle and even greater. I'm not a fan of the knurled look, but hey, if it just needs to hold electrical components, looks doesn't really matter. I for one will keep this in mind going forward.
So I want to give you kudos for the idea of a slanted print!! I had a battery holder for my Meta Quest 2 that has only 2 mm walls around the battery and it snapped along the layer lines to easy so remembering this video, I thickened it up at the base and cut it off so I could print it at 45 degrees and also had no support!! thanks
interesting technology. I just tested it on a small case. it was printed well. printing at an angle helped to minimize shrinkage of ABS plastic. thanks!
This is amazing! I will definitely take inspiration from this for future projects. Can I ask what fuzzy skin settings were used for the texture? It looks great!
Great video Gabe! I love how you desigbed the support and used sprues to easily come off. Plus being able to add texture to all sides is great for this. I just did a fuzzy skin tutorial on my channel but you cant get the top layer fuzzy. With this in a lot of cases you can
Super impressed! I would have thought you’d need more support. Definitely going to try this. The noise looks good and would also hide some imperfections like seams etc. thanks for sharing.
I found on my printer that most things print better at about 40 degrees. I use tree supports when necessary but usually find an angle to eliminate supports. I like the fin Idea.
Thank you! Very well explained and digestable. I have some components to print that I've been dreading due to the overwhelming amount of support material. This solves that dilemma.
I would love to try this technique on a part i am designing right now, but I am not at all clear on good dimensions for the fin, or on how to shape the connectors from fin to enclosure, or how far apart to space the connectors. Any thoughts where to find some details so hobbyists can use this idea successfully?
Oh! I always use the straight edge overlap for lid when i need it to seal and self adjust, but this inclined edge look way more better. I give it a try straightaway 👍
Just curious: why you used the short edge to print it diagonal? All the benefits (strength, surface finish, less support,...) could also be achieved with laying on the long edge.
If you consider each layer as a potential shear line/failure point, I would not place the tabs on top and bottom but on the sides - regardless of the box dimensions.
That's pretty nice. I like the idea. 👍👌I don't know if you mentioned it, but you also prevent it from warping, because you don't print big surfaces. I will try this and hope it will work on my bed slinger.
What if you wanted to print diagonally because of the benefits you described but you also wanted to add a logo or something to the box? How should it be designed than? Like an outline on the box so it could be glued on latter? What is your recomendation for this case?
Great content, thank you! It was very difficult to see the details of the box in your hand because it was black and the video backdrop is dark. I suggest using white filament for the items you present in your hand. It is just a suggestion. Your videos and content are awesome!
Hi. Great idea. I've tried to do the same but with bad result. Basically I still have wobbling for the first layers. The wobbling part last until the short face does not end (the one that is the high if you print it flat). As soon as the printer pass over it is perfect. I've tried to add support on both faces with no better results. Can u guess me a reason for? I really need to solve this for my project. I hope description is clear.
*Get split diagonally.* But on the serious note, I do appreciate the support building tip. I never thought of making my own support in cad. I wonder if I can just make a 45 degree support separately and print them both together touching each other (placed in the slicer tool).
Yes, you are about to. I know in Cura slicer specifically, you can import an object and then specify it as being support material. I have not specifically done this, so there may be a steep learning curve to making sure everything is aligned and not intersecting.
I really like this. Primarlily as it eliminates the possibility of bed adhesion problems. But the perks of fewer supports (for grid aligned geometries), and better use of build volume is crazy.
You have far less area to adhere though, this method is more likely to come loose printing at high speed on a Cartesian (core Z) printer. It does help if you have over-adhesion, but not if you have too little.
@@_..-.._..-.._ That depends on the support structure built. I've since used the method to good effect, but not at speed. However, it produced a very nice part.
I have got to try that method for designing supports in CAD! I definitely do notice the wobble when using auto-generated supports, this looks like a great solution! P.S. Fits your channel name perfectly lol
Would that support survive on a gast bed slinger? I guess you should align the axis the bed moves on with the support fin, else I can see it wobbling a lot the higher it goes.
Perhaps this is for devices as not buildings - how would you go about having a custom electrical enclosure pass code such as NEC? Doesn't everything used in a building need to be listed?
Ok, I get the benefits and understand the support. But I don't understand the edge of the part that touches the bed. In theory, it is just an edge with zero width. How do you design the apron or puddle for that edge so it will come off easily and leave a clean edge?
I was just wondering what kind of filament are you using to keep it resistant against catching on fire. I designed a case for batteries I have, but now need to find a filament that will pass reasonable resistance to catching on fire from sparks etc.


Don't want to design your own Support Fins?
Get the STL's here: www.angled.xyz/product-page/support-fins-for-tilted-designs-stl
That is awesome. I am new to 3d printing
What program do you use for designing and creating the pieces?
@@saxtalia it's fusion 360
There;s another huge benefit to this slanted printing tyechnique, which you hinted at with mention of a textured finish. Now that NO SURFACE is printed on the bed, it's possible to be very creative with what you print on the surfaces; logos, ridges, grips, etc. all become possibilities.
You may also want to print at an angle if the material has a high shrink rate.
I've always heard that angled printing is great but never considered how to get over the toppling issue. Thank you for explaining so clearly for us!
Glad to help
Man, I second that. Thank you so much! I just split a part into two pieces where I could have just went with your idea. I truly appreciate your help.
I've been doing something similar, but I just use the paint on supports in Prusa or Orca rather than building a support into the design.
"3D print on a slant" - Channel name checks out 👍
Shift in perspective
I think its hilarious that I didn't figure that out til about the 20th video I watched where everything was printed on an angle :D
"Print with a peg-leg"
This was exactly what I needed for a complex enclosure design, I was just resigning myself to having to print it in three pieces then saw this. Decided to give it a go and man did it work well! Thanks so much for taking the time to share this trick.
This is where 3D printing really shines: Have any PCB and _always_ get a case with the perfect mount points. And (traditional) case manufacturers seem to have noticed - prices seem to be coming down... Thank you for your videos (I watched the entire playlist over the last few days 🤓)!
I've just started 3d printing about a month ago. I was thinking that printing diagonally would solve lots of problems, but i hadn't seen a video of anyone doing it. Thanks for explaining this.
It will also introduce a lot of new problems.
Another way to solve a lot of problems is to go composite.
It can be as simple as just printing different parts each in the most beneficial orientation and then assembling em all together or not so simple as using different methods of manufacturing for different parts.
This way does not add many new problems, but does make it much more complicated.
@@gouryyes I think you are right. These methods are not all or the other. For example the enclosure could be printed slanted but the lid be printed with ideal face facing down for a nice build plate texture.
I love this series. I don't intend to mass produce anything, but still use this as a design guide for my future projects to avoid failed prints and filament waste (both for ecological and financial reasons).
I love the clear, concise and quick delivery from this channel.
Thank you
I do this trick with organic prints at times. As I have an FDM and an SLA printer, I have the mindset of Resin printing that uses the "angle" technique a lot. I've actually (with good success) set up resin prints, exported them, and then printed them with my FDM printer. Meaning I've used the supports generated from the Chitubox to print on my FDM printer.
I have not delved into designing custom supports, but it definitely, inspired me to do so. This "fin" idea is really great!.
I made a box just like this one and printed it exactly that way.
It was very good, the best thing in the world is to print at 45 degrees.
Thanks for the video.
This channel is a gold mine for beginners like me who make their own models to 3D print
Now I just have to figure out how to design properly ':D
Since I saw this video printing on a slant, I've been using it for a lot of my projects that require strength. I mostly print PLA - my Ender 3 v2 (or me) struggles with PETG. All I can say is thank you so much for showing this. It really make so much sense.
I took your advice on this from past videos and printed a wall mounted headphones hanger I designed by cutting the back corner off off and printing at an angle. The base was about 45x60mm but now I was only printing about 8x60mm on the build plate. Gave me a super smooth surface on the rounded bottom where the headphones sit rather than lots of ledges from the layer lines. The front and back walls that keep the headphones centered printed fine even at 35-50 degree angles. Not the right approach for every part I think, but makes a lot of sense for many. Of course better to remove from the plate for production too.
I did not design a support, but it wasn't needed for such a small part. One of my considerations was also strengthening the two screw holes as you mentioned and making the front wall that keeps the headphones in place stronger by not making the layers perfectly vertical. Worked great the part is very strong despite being a couple mm thick at the front.
Great tip using the thin support on the back side. Can you please post the CAD model so we can have a closer look at the dimensions used in the supports?
Yes this, would like to understand the support in more detail
I think that it is so cool how you guys Mass produce 3D printed parts for yourselves and others.
And that in doing so, you run into all of these little interesting problems!
That are very important to the 3D Printing community, and then you share those things you've learned with other people!
It's really cool! It's the collective knowledge of the group, which works because of love.
With modern slicers, tree support doesn't cost much material or postproc for the vertical orientation. But diagonal still has lots of benefits. My favorite is that an assembly-relevant dimension of the part isn't dependent on bed offset (which isn't perfectly reproducible) or on layer height quantization.
You'll still end up with much better walls using this trick rather than printing them vertically with weak layer lines or horizontally with a 90 degree supported overhang.
Tree support won't be as clean to remove as this method either.
Not being from the molding world, I had to listen to 3:22 about 50 times. Finally I think he said "sprue" so I looked it up and shazzam - I have learned an entirely new word.
Same
same, I was like, "screw? screw?"
I'm new to 3-d printing; still waiting on my first printer to ship. This tip is gonna be so helpful. Thank you!
I was reflecting on my 3d printing journey and realized that most of the really quality ideas I use, I have got from Slant 3D!
You just solved a major issue i had with concrete printing.
way to go!
Going to print a house on its corner?😅
@@TechMasterRusyou can fit more of them into a neighborhood.
Wow thank you for the great suggestion. I have a box that I was printing up and it was costing a lot only for support. This method allowed me to save 40% of material.
Feels like using the supporting techniques from resin printing in fdm printing.
awesome
I just did this for a new print that took 7-8hrs. I was a bit nervous as I always used supports. The end result was amazing. 😃 I didn't have a 45' on the bottom edge of my print, it was a 90' point which proved fatal after the first few minutes. I proceeded to add a .04mm base around the point edge that easily shaved off post processing. Thanks for the tilt orientation tip, will be doing this much more often.
Thanks for this. I am doing a print this way tonight to see if it works for me. Even created a fin though I went all the way to the top with the fin and probably didn't need to do that watching this again.
well i'm immediately glad i stumbled onto this channel. my cad game is about to change
You should learn to use tree supports with the option of baseplate only. Bayer auto-generated easy and clean to remove
I learned this by accident when printing the bridge of a stringed instrument on my Ender 3. I had to orient it diagonally with some support primitives to make it fit on the bed, and found that is ended up being one of the strongest objects I'd ever printed.
Great tip. It's worth considering though that this will also increase the mass and print time. You notice on the slicer that you get additional walls when you print on the diagonal to ensure vertical shell thickness during printing, all those purple walls. You could maybe add another 2 walls to the flat print for a faster print with similar weight and strength.
Great idea! I like how you keep the video shortened to the point. I don’t like watching videos that are so long that you don’t finish them sometimes. You’re the best!
I love this concept. Will have to give it a shot on some test items. Thanks for sharing. Love the fuzzy look of the print as well.
When you guys do tangled testing, will you guys do strength tests with the pieces printed diagonally in addition to the standard flat and vertical?
i actually built and tested my second printer 5 minutes ago (Tronxy XX11, built from two Tronxy X1's - to make portal instead of arm), you guys are inspiration for me to do so, thank you very much!
That sounds really cool! Do you have a link or video of your XX11 you built? I'm very curious to see what it looks like and how it prints. Thanks!
We appreciate that. Best of luck to you
@@KensCounselingCouch havent changed anything yet about firmware or even settings, so print quality is really bad. Basically mirrored all of it, so build volume is the same, but it is now more rigid and stable. Noise is the same, though, which is sad. That may be due to usage of cxy-v1 board with bad stepper drivers. That thing is ancient, but for its price (it was 1/3 of a price of anycubic kobra neo which i own), i wont complain. I would be changing plastic stock bed with glass one, then adding heated bed - need to figure out how to make it temperature resistant, acrylic bed base wont be good for 90 C bedtemp i need for PETG, for example. Lots of work to do, but it is quite fun project for me. Here are the photos of it and test print that came on sd card, both of it look lame, tbh. ( ibb.co/30DHG2n ibb.co/kHhTK0N )
Showing the strength difference of a 45 degree print in another video might be cool, with solid numbers and such. I've always thought 45 degree is probably a good general orientation for strength but no ones really done much research on it.
i just realized (3/4 of the way through) is the reason this works is the part is only at a 45 degree angle, which means, the part doesn't need "supports" to help it print, only a support to hold it up in place .. nice work.. !!
Yep, I have a box where this will work perfectly (but that I now print flat on the bed, which also works perfectly, but the slanted version should be stronger.)
You just made several improvements to an item that i have been making for our company Thank You!
I tried this yesterday on a small project and it worked well. As it was only 2 items I just used Cura custom and auto supports in combination.
Thanks
was wondering if could use something similar on resin print...always found hard to make bases on resin...but this mm support between the fin and the piece would be the same as using regular automatic supports for resin, right? Hard to think on something that would give support but still be easy to break/separate from the piece after...
Just tried out printing at 45 degrees with the fuzzy pattern and it looks amazing, what a great idea!
I would love to have a "noise" texture tutorial! What are good settings, maybe for what shape / use case? What do you think?
I second this, i came across a 3d print at work earlier this week, which i thought was molded, but assured it was 3d printed, this noise could well explain it and i would love to replicate at home
@@TEACypher try "fuzzy skin" setting in the slicer?
Great tutorial! Definitely will consider trying this.
As for noize for outer shell: can you please share your parameters of fuzzy skin to try same? Looks really good 👍
they already made it
Doesn’t that affect all external walls? If so, it would interfere with tolerances on items that are intended to mate
Great video!
Video idea related to this one: You guys should do one about how to add fuzzy skin on designs in both Fusion360 and Shapr3D
Why add fuzzy skin to the model when you can just do it in the slicer?
This is awesome! I will try it in a smaller scale. Maybe i dont even need fins. If you turn everything 45° nothing needs to be supported. So simple but effective. Thank you!
Any videos on waterproofing 3d prints could not find any
So this is interesting. I have a conveyor belt 3D printer (CR-30) that inherently prints at a 45⁰ angle. I always thought of that as a negative. I think I'll try to design some stuff with that extra strength in mind.
I did exactly this when printing some custom Chicago screw fasteners and now I feel retroactively smart.
Excellent. I particularly appreciate the designed-in supports concept. I will definitely design some things to print at an angle next time I am concerned about horizontal/vertical layer delamination.
The bit about built in supports was great. I have not yet tried it on my designs, but I can see the uses. Also, printing at an angle like this would likely be less prone to warping off of the table like a long part would.
Thanks! Tried the support variation immediately and it worked like a charm 😊 ❤
Hi there Slant 3D. I've only recently started watching your videos, but am finding them informative. Particularly this one. I employed this support and printing technique to print a thin walled air duct that was essentially a 90 degree elbow. I was able to print it without any supports apart from the 45 degree custom support "spine".
I did want to comment on your microphone. You appear to be using a Blue Yeti. The microphone pickup elements in this (there are 4) are oriented with their planes parallel to the microphone body axis. The way you have it positioned in the videos is with your voice hitting along the axis (such as is typically seen with normally hand held mics). You should be talking at it laterally, from the side to maximize pickup. Use the pattern knob and try out some positions. You might discover it sounds way better.
Cheers!
Having printed for multiple years, and exposed to the internet for too long. I was really sceptical of this "miraculous" claim. But gave it a look. And it actually makes a lot of sense, most printers print happily at a 45 degree angle and even greater. I'm not a fan of the knurled look, but hey, if it just needs to hold electrical components, looks doesn't really matter.
I for one will keep this in mind going forward.
So I want to give you kudos for the idea of a slanted print!! I had a battery holder for my Meta Quest 2 that has only 2 mm walls around the battery and it snapped along the layer lines to easy so remembering this video, I thickened it up at the base and cut it off so I could print it at 45 degrees and also had no support!! thanks
interesting technology. I just tested it on a small case. it was printed well. printing at an angle helped to minimize shrinkage of ABS plastic. thanks!
your videos are gold. thanks for your service!
Thanks for watching
This is amazing! I will definitely take inspiration from this for future projects.
Can I ask what fuzzy skin settings were used for the texture? It looks great!
Also interested in the fuzzy skin creation
Great video Gabe! I love how you desigbed the support and used sprues to easily come off. Plus being able to add texture to all sides is great for this. I just did a fuzzy skin tutorial on my channel but you cant get the top layer fuzzy. With this in a lot of cases you can
nice and short and straight to the point . good video . thumbs up
This is very helpful for a project I hope I 1day get to make :) thank you for being so open about your best production practices
Glad we can help
Super impressed! I would have thought you’d need more support. Definitely going to try this. The noise looks good and would also hide some imperfections like seams etc. thanks for sharing.
Underated surface texture
I found on my printer that most things print better at about 40 degrees.
I use tree supports when necessary but usually find an angle to eliminate supports. I like the fin Idea.
Thank you! Very well explained and digestable. I have some components to print that I've been dreading due to the overwhelming amount of support material. This solves that dilemma.
I would love to try this technique on a part i am designing right now, but I am not at all clear on good dimensions for the fin, or on how to shape the connectors from fin to enclosure, or how far apart to space the connectors.
Any thoughts where to find some details so hobbyists can use this idea successfully?
Oh! I always use the straight edge overlap for lid when i need it to seal and self adjust, but this inclined edge look way more better.
I give it a try straightaway 👍
Just curious: why you used the short edge to print it diagonal? All the benefits (strength, surface finish, less support,...) could also be achieved with laying on the long edge.
Incorrect
If you consider each layer as a potential shear line/failure point, I would not place the tabs on top and bottom but on the sides - regardless of the box dimensions.
That's pretty nice. I like the idea. 👍👌I don't know if you mentioned it, but you also prevent it from warping, because you don't print big surfaces.
I will try this and hope it will work on my bed slinger.
I love the way your videos expand my thinking of what's possible. Thank you!
Hey, I discovered your YT channel a while back and I really enjoy the content and all the knowledge- thank you ❤
thank you so much for sharing your knowledge, you just saved my project !
I tried this and it worked really well, perfect actually.
One of the best 3d printing tutorial on YT ❤
Wow, thank you!
How did you get your surface to be textured and not show any layer lines?
@@ruthlessluder I’m curious as well.. maybe ‘fuzzy’ setting?
Amazing recommendation on the support structure, and doesn't look too hard design into the part! Thanks for the tip :)
How to add the texture to outside you mentioned
What if you wanted to print diagonally because of the benefits you described but you also wanted to add a logo or something to the box? How should it be designed than? Like an outline on the box so it could be glued on latter? What is your recomendation for this case?
Great content, thank you! It was very difficult to see the details of the box in your hand because it was black and the video backdrop is dark. I suggest using white filament for the items you present in your hand.
It is just a suggestion. Your videos and content are awesome!
how did you add the noise to the outside of the print? Great look. thank you
Shouldn't the desgin support be long enough till to the top of the casing? Why does it end at half of the case?
How do you "add a little noise" to get that texture?
Awesome as always. I need a master class in cad software by you in my life haha.
Well done ⭐️your videos are excellent. So informative 👌
Great again, thank you! Your design tips took my printing to a new level of capabilities!
Great idea! Thanks for sharing and showing how it's done in CAD! Many greetings from Germany.
How did he get the texture of that part? I would have thought this was SLS not FDM. Very clean.
‘Fuzzy’ setting
Just wow. Glad that i discovered this channel earlier. ❤
Hi. Great idea. I've tried to do the same but with bad result. Basically I still have wobbling for the first layers. The wobbling part last until the short face does not end (the one that is the high if you print it flat). As soon as the printer pass over it is perfect. I've tried to add support on both faces with no better results. Can u guess me a reason for? I really need to solve this for my project. I hope description is clear.
I can see this still be useful for one-offs in some cases (ha!). Great idea!
*Get split diagonally.*
But on the serious note, I do appreciate the support building tip. I never thought of making my own support in cad. I wonder if I can just make a 45 degree support separately and print them both together touching each other (placed in the slicer tool).
Yes, you are about to. I know in Cura slicer specifically, you can import an object and then specify it as being support material. I have not specifically done this, so there may be a steep learning curve to making sure everything is aligned and not intersecting.
This is legendary, you just gained a subscriber
I really like this. Primarlily as it eliminates the possibility of bed adhesion problems.
But the perks of fewer supports (for grid aligned geometries), and better use of build volume is crazy.
You have far less area to adhere though, this method is more likely to come loose printing at high speed on a Cartesian (core Z) printer. It does help if you have over-adhesion, but not if you have too little.
@@_..-.._..-.._ That depends on the support structure built. I've since used the method to good effect, but not at speed. However, it produced a very nice part.
I have got to try that method for designing supports in CAD! I definitely do notice the wobble when using auto-generated supports, this looks like a great solution!
P.S. Fits your channel name perfectly lol
How did you add the noise to the exterior surface? Can that noise be a wood grain pattern?
Very useful tip/trick!
By adding noise to the print to get the finish, how do you do that? Is that like fuzzy skin?
How to you add noise for that rouger surface finish
Brilliant design! How did you get that beautiful texture again? Is it done with some slicer options? One can see no layers at all - it’s fantastic!
I have to try this... I've had few prototypes fail because horizontal and vertical orientations didnt work. Thank you!
Would that support survive on a gast bed slinger? I guess you should align the axis the bed moves on with the support fin, else I can see it wobbling a lot the higher it goes.
This is freaking sweet. This channel gives a lot of great design tips. Good stuff!!
Thank you
Perhaps this is for devices as not buildings - how would you go about having a custom electrical enclosure pass code such as NEC? Doesn't everything used in a building need to be listed?
Ok, I get the benefits and understand the support. But I don't understand the edge of the part that touches the bed. In theory, it is just an edge with zero width. How do you design the apron or puddle for that edge so it will come off easily and leave a clean edge?
I was just wondering what kind of filament are you using to keep it resistant against catching on fire. I designed a case for batteries I have, but now need to find a filament that will pass reasonable resistance to catching on fire from sparks etc.
One question I am sure we all have... could you use the 1mm gap between the base and the lid and make it where you can crack it apart after printing?