How to Make a Simple Flip-Top Tool Cart for the Workshop

HTML-код
- Опубликовано: 10 фев 2025
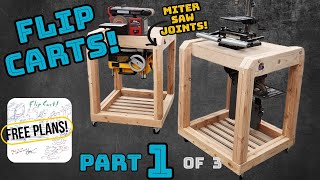
- My shop is rather small, and I needed more workbench space--and I got a new tool. So I decided to make this Simple Rolling Flip-Top Tool Cart to put my planer and sanders on. It's awesome and I'm so glad I did it.
One of the best parts of this Simple Rolling Flip-Top Tool Cart is that I made it using "scrap" wood leftover from other projects, from a bundle of junk wood that I got at my local hardware store, and some things we found in the shop that the previous homeowner had left.
So, this cart literally cost me almost nothing. Taking into account the bundle of junk wood, I am probably looking at a $10 tool cart.
That's amazing and I'm so happy with that.
Oh, and the whole "how cool is it that I made a tool cart that flips". That's pretty awesome too.
We've had it in the shop now for a couple of weeks since I actually made it and when I could get the video ready (which you should totally check out--and be sure to subscribe to my RUclips Channel...) and it's so useful.
After you've checked out the video, if you want to get the written tutorial, check out my blog for more detailed instructions: nerdymamma.com...
Also, if you want to support this channel and help us make more fun videos, sign up to support us on Patreon here: / nerdymamma
WHERE ELSE CAN YOU FIND US
Blog: nerdymamma.com/
Instagram: / nerdymammarocks
Facebook: / nerdymamma
Pinterest: / nerdymammablog
MUSIC
Breakdown Kevin MacLeod (incompetech.com)
Licensed under Creative Commons: By Attribution 3.0 License
creativecommons...
Cool Rock Kevin MacLeod (incompetech.com)
Licensed under Creative Commons: By Attribution 3.0 License
creativecommons...
Floating Cities Kevin MacLeod (incompetech.com)
Licensed under Creative Commons: By Attribution 3.0 License
creativecommons...


You made this so much less complicated than other makers! I’m wanting to build one for my big belt sander and my little bench top grinder, but I’ve become overwhelmed by soooooo many complicated builds on RUclips. Thanks for breaking it down to basics!
Thanks for keeping it simple. Most of the the other flip carts on RUclips are too complicated and require a table saw. I love it!
Thanks! I love making super simple projects...
Finally someone that did a simple and easy to understand flip top workbench bravo, love that you use only 2 x4 and left over plywood nice job
The idea is to save space. Mission accomplished! And as many have commented; you did this as simply as it could be done...
Easy-peasy. Some others make it so complicated, but you kept it simple. Thanks.
Love it. Made it look simple. Thank you
Appreciate your simplicity of the design.
Thanks for your wit and your flipper.
I thought 💭 I had seen all the flip top videos! And then booom! Your video pops up 🆙 I believe I like 👍🏻 yours the best so cool 😎 and easy to do! Thanks 🙏!!!
Great video production, perfect balance of narration over fast action and music that is not obvious.
Smart torsion box construction for the flip top. Love use of salvaged materials. Great design!
This must be the most beginner friendly built. Definitely the easiest and straightforward built for such a table in YT land. I was sure I had found the easiest recently but this beats it by a long way. This is easily done by a beginner like myself. I especially liked the comment about just needing patience when drilling the rod holes with an ordinary drill because everyone else used a drill press making easy work of it and I was beginning to wonder if I had any chance with my 18V ryobi.
ok ive watched a bunch of these and this is by far the easiest and most straight to the point one.. other videos were giving me a headache... good job
Very nice. I'm going to try it asap.
Good job! Easy!
Good Deal! Keep it cheap yet functional!! You're not gonna wheel the bench into your livingroom, it ain't gotta be fancy!!! Those screws are the shit, I love using those with my 18v drill, I can sink them through a 2x4 and they will not break!
I have built three of these this week. Easy to modify sizes. I have 3 tools on each one. Love the simple design. By the way, I used 3/4"pvc for the pipe and it works great and easy to wire. Thank you. By the way, just out of 2 x 4s still cost a chunk. However casters most expensive part.
I really like this build. I’ll be basing mine off this. Great work.
This was nice and straight forward project as shop projects should be! Very nice!
Just watched this; I love the simplicity and that you used materials on hand. Well done!
This is a flipping good idea.
From the UK
Love it!! Enjoy your explanation of what ever it is your doing, or building. You obviously enjoy building stuff! Keep up building sturdy frames with 2x4s!
Nice work, just what I am looking for and pretty similar to what I had in mind. Nice and simple to make, no complicated drawers etc etc.
Kool job it gave me a idea for a flip top nonmoble workbench and your video I think may have finally gave me the direction to go in. Thanks and God bless you and your family.
Love the simplicity of the stand. And I especially like using scrap wood. My car jerks to a stop when I get near a throw out wood pile!
He estado buscado la mejor manera y facil de hacerlo y este es el video que estuve buscando por mucho tiempo. Muchas gracias, greetings from CHile
OH, I love this! My husband is going to love it, too! (Because I keep finding projects for him to make...but, I'll help with this one!). And we will both love the fact that we can move it back up against the wall! Thank you for sharing! :)
You probably dont give a damn but does anyone know a method to get back into an Instagram account?
I somehow lost my password. I would appreciate any help you can give me
@Zander Raylan instablaster ;)
@Will Paxton i really appreciate your reply. I found the site through google and im waiting for the hacking stuff atm.
Takes quite some time so I will reply here later when my account password hopefully is recovered.
@Will Paxton DAMN IT ACTUALLY WORKED! Literally got access to my IG account within ~ 30 minutes of using the site.
Just had to pay 15 bucks but for sure worth the price =)
Thanks so much, you really help me out :D
@Zander Raylan you are welcome xD
So simple!
Great video keep up the good work!!!
Loved your video. Especially the idea of the stop block.
Good job! These guys who build a tool stand like it was a pie ce of Victorian furniture are so annoying. This gets the job done with minimal cost and effort.
My was a bit more elaborate with side shelves for accessories. It holds the planner, router table and grinder(on top of the side shelf)
Same as you, built from scraps until lumber prices drop.
Love the simplicity! Built two this weekend. Tried to post a pic - but couldn't. Thanks!
E visto varios videos para hacer uno de éstos y éste es el menos complicado. Así lo voy a hacer. Muchas gracias por compartir. 👍
Very nice job. I will try that because I need a flip table.
Nice work with a fun sense of humor! I be ‘scribing:)
One question I have how has the casters held up with that weight any flat spots I thought about useing metal casters. Thanks for the great build.
Those have been made for many years. Certainly longer than this one.
Love it. You "K.I.S.S.d" it! Surprised that this hasn't been viewed more. Best part about it? Your kids with their ear muffs on! Anyway you could add the dimensions &/or plans? Penciled out is great!
Thanks! The kids are pretty awesome. Here's the link to the instructions with the dimensions for the cuts.
I've been considering building one these for my planer but am concerned that I might not be able to actually flip it due to the weight. (my planer weighs 70 lbs) Do you find it easy to flip?
Awesome !!! I love that you used "found materials" and stuff from the cull rack. I've been looking at flip tops on RUclips for ideas, and yours fits what I'm looking for. A tool stand should not cost over a hundred bucks to make... I don't need Baltic Birch for everything in the shop, like some of these pros use... I've subscribed and will be checking out your other vids and looking forward to the next ones.
very nice one question how do you fix the planer and sander on it just screw or bolt if bolt how do you put them on
I believe the holes to screw on the plainer lineup with the support braces and I would use some serious course threaded screws.
Nice simple build good job! But my OCD is killing me!
Great job! Nice simple and easy design. I'm building it this week! Dimensions?
Can I use 2x6s and do this or will that mess up the plans
I just cut the 2x4's today. Watched your video again. I'm curious why you didn't extend the top and bottom all the way to the edges of your base?
what are the mesure of the boards
At around 6:30 you are drilling without having tied back your hair. My brother is missing a huge patch of his hair because he failed to do this many decades ago.
When giving instructions, you don't say "2 short pieces, 2 long pieces". You give the measurements of the pieces "2 20 1/2, 2 24 inch"..etc.
Also, you use a 1" drill bit to drill a hole for a 3/4" pipe, not a 3/4" bit.
What screws did you use to secure the planer, etc?
I wonder that same thing. I am not sure I want regular wood screws there.
I might use nuts and bolts with washers, on each top, before screwing the tops down to their final position. Just thinking?
Good job! I'm building one... or, rather, my chief minion is building one. One question: is there any trick to keeping the power cords organized? Just rolled up until you need them, or do you have a receptacle mounted on the cart itself that they always stay plugged into? Thanks!
Why don't you give the sizes that you have on your video. I need to make one but don't know what the sizes are?