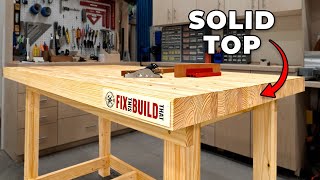
Building a Rock-Solid Handloading Bench

HTML-код
- Опубликовано: 7 сен 2024
- I'm getting back into handloading, and this time I wanted a bench that doesn't tip over every time I pull the press handle. This is about building one.
Produced with CyberLink PowerDirector 11


I know that this was video’ed a long time ago. 👍🏻👍🏻to Don for carrying somewhat concealed at home.
Hi Don,
Yes, like the other guys have said, your job is a good one. I watched this just a week short of a year later,..well it's now Jan. 05 2016. You've given me two things in this. One the push start I needed to build this, and two, ideas on how to do it. Making it a solid work base is important for sure; you've done this.
Thanks for taking the time to make this video.
Cheers !
Like somebody said earlier the craftsmanship on this table is high quality. I went to school about 10 years ago to become a carpenter. Your work is just as good as a veteran Mr. Don, so good I will be making my table the exact same.
Thanks, JC. If I had it to do over again I'd reconsider the use of the 2X4 hangers to fasten the legs to the 4X4 legs. The 'wings' overlap the edge of the 4X4s, and can be dangerous. At least be prepared to file or cut them off. Thanks for the compliment; it was my first attempt to build anything like that.
Don Cline I built a toy box for my nephew a couple years ago. You can go without the hangers and use long screws. But the hangers give the table some class making it stand out so shaving down the sharp edges will work but I wouldn't take them away.
Don, finished my bench today. Very pleased with the results. Thanks for your video, it inspired me.
Wonderful! I'm sure you will get great use out of it.
Very, Very well done Don, you just gave me a couple of idea's. Thanks.
Great video Don. I found a Simpson Strong Tie Workbench Kit on amazon, $40. It has ties, screws, and great instructions included in the kit, you just add wood and tools. I used my own measurements converted from the kit's plan. Once my cut list was complete, I assembled mine in less than a hour. Yes, I could have built one without the ties, but if I ever want to change the size or take it apart to move it, just remove the screws and it should be an easy operation. Also this is solid as a rock, my total cost was around $90 (30"x60") but, I had scrap left over from the odd size.
Haha. Yeah, I bought three different kinds of 2x4 hangers. All the wings stick out a little bit. So far I'm enjoying it.
Great looking bench Don, Thank you for sharing you build.
You're welcome, Ron. Now it is at my new house and being used as a workbench in the garage.
I really enjoyed this video. This is one of the better looking loading benches I've seen so far. And a fun video to watch. Great job.
+Gary O'Neal Thanks!
Nice job Mr. Cline. I could never do such a nice job. I have to build something soon.
Top quality bench.
Inspirational. Great job using common materials from the hardware store. Would like to see it in operation and any details added.
+Miguel S Okay. I've been using it with a Hornady Lock 'N' Load AP press, so I'll see if I can work up a short video showing it in operation.
Hey Don, I am currently building this bench using your design. I've increased the height of the legs to 38". I just bought all of my wood this morning and will begin finishing and sanding the wood this afternoon. I'll post how it turns out. Thanks for the video.
Good deal! Hope you like the results. I have to say I would not have used the 2X4 hangers if I'd realized the "wings" on them would be wider than the 4X4 legs -- or I would have taken the extra time to saw or file them off. In any event, the results have been excellent; the bench is rock solid.
I draft for a living and let me say your blueprints look pretty darn good.....Nice bench....lets see it with your press on it
Thanks for the compliment. I was a Sr. Electronics Tech back before the digital revolution, and had to do all my own schematics. Uh, I'm not sure if it is possible to upload a still picture to this forum. Right now the bench is piled high with stuff I'm moving around the house, but I'm going to have to get it cleaned off again pretty quick; my wife is running out of 9mm. Imagine a Hornady Lock 'N' Load about a foot from the right end, and a Hornady Case Trimmer mounted on the corner. Wood-grain book-shelves to the back of the bench with a perfboard for tools behind it. Then there is a balance-beam scale, etc., and a small aquarium with a bubbler on the back shelf to increase the humidity in here so Unique doesn't plaster itself to the walls of the Powder Measure and refuse proper metering.
Maybe another video is in order? Good idea with the aquarium but that dang Unique sticks so bad....I have it but hate how it meters....I love titegroup so i stocked up on it....Meters like water
You did a nice job on the bench for a non-woodworker. Interesting use of joist hangers and post mounts. There are a couple of changes you may want to consider if you build another. For the top you may want to use birch rather than oak. Birch is much smoother and has a very close grain. After it is finished it is much easier to clean and is better to write on when making notes when reloading. Also if you use a sheet of pine B/C plywood the same size and glue it to the birch, this gives you a very stout top. You may can leave out the middle rails and stretchers as this is overkill given the size of the project. You also mentioned that you would not use the metal brackets, a great alternative to that is pocket screws. When I built my bench I used my Kreg system and it worked great. Overall nice job.
Thanks. I'm happy with the way it turned out, although I would not use joist hangers and post mounts if I did it again. (But I don't expect to be doing it again.) :) The use of birch rather than oak and B/C Ply sounds interesting too. As it turns out the oak worked out okay because I put a sheet of static-free grounding sheet, the stuff used by electronic technicians (I was one) to work on CMOS devices on the top surface. I grounded it and the reloading press to the AC ground to cut down on static. The average humidity level where I live rarely gets above 5% except during the monsoon season, and touching anything results in a zap. I don't want that to happen when I am working with gunpowder and primers. Thanks again for your suggestions.
Mostly glue and joints that works with some “T Slots” imbedded into the surface. If I want my Dillon then I go get it fixed to the base will be every thing to get going. If I want a vise I get a fixed base that holds the vise.
Good luck.
Nice job...great craftsmanship. A little much for me...but it sure is nice.
Thanks, Roger. I'm not so sure about the craftsmanship, but it is solid.
Great job Don.? Thanks for sharing. Would like to see your video, Of it when all is mounted on the Bench.?
+A REDTAIL Already did. See ruclips.net/video/OeqBdWzD9eM/видео.html.
Nice table. I like the two shelves. I'm not sure if the 3/4 inch table top is strong enough to handle the stress from a reloading press.
It did just fine for over a year before I quit reloading for other reasons.
@@K7FFN I understand. I haven't reloaded in decades but I will start again when circumstances change. Best wishes. Be safe and in good health.
@@tyronekim3506 Same with me when I built the bench. I quit reloading after a year when I blew up my wife's Valentine's Day gift (S&W Shield) with a double load of powder. I decided I have too many things on my mind to pay close enough attention to what I am doing, so I decided discretion is the better part of valor.
@@K7FFN Take care and be well.
Nice bench
+Steven Johnson Thanks! It's working out real well.
Hi Don... Wow, what a video! Very impressive... I have 2 quick questions... I have not watched the video entirely, I skipped around a bit so I may have missed if you answered this either in the below comments (I read a few but not all of them...) First question, ball-park cost for this entire table for all the materials (including finish, etc.)? 2nd question, is the table able to be partially disassembled in the event of having to move or transport it elsewhere? Thanks for the great video... Very nicely done!
Emerson Goodrich Total cost was $163.81 for the wood and the metal joiners and water-soluble Minwax for finishing. Well, I didn't make any attempt to allow for disassembly in any convenient way, but if you back out the screws I used it can be disassembled. One thing I want to caution you about is that the metal 'hangers' I used are meant to be butted up against flat wood, and as a result they have little 'wings' that protrude out beyond the edges of the 4X4 legs. You want to be careful about those to see they don't snag on anything.
Don Cline It's not too late. You could put those post mounts on the backs of the front legs so they don't show. Those brackets are soft steel so you could hammer those sharp wings on the 2X4 hangers around the sides to keep them out of your skin and clothing. For a very few dollars more you could have used oak for the backboard and edge trim. Just sayin' as the youngsters say.
Ray (67 Also retired SEET)
I like what you did but I won’t build mine with screws.
Okay. What will you build it with, then? Glue? Nails?
I'm trying to answer Edward Petty by saying "Thanks. Now, if I could just afford reloading components ... :)" but the Reply button flashes when I click it but doesn't accept the reply. Oh, well!
Ah! Apparently I have to run the video and get past the ad before it will accept comments. Hmm.
Nice !
Thanks, Capt. It worked out pretty well.