
- Видео 8
- Просмотров 308 455
Brad Henson
Добавлен 28 фев 2008
PWM on the Raspberry Pi Pico with MicroPython
In this video we will define what a Pulse Width Modulation or PWM signal is, build a circuit that controls the output of an LED via a potentiometer, and we will write the code to produce a varying PWM signal mapped to the ADC’s integer output.
00:00 Intro
00:33 PWM Background Information
01:52 Pico Hardware Description
02:32 PWM Groups
02:40 Circuit Build
03:19 Programming
03:44 Choosing 1000 Hz
04:29 Recap
The parts you will need to follow along with this video are:
1x Raspberry Pi Pico
1x Micro USB Cable
1x Breadboard
1x 10k Potentiometer
6x Jumper Wires
1x LED
1x 150 Ohm Resistor
Hardware Links:
Elegoo Electronics Kit: amzn.to/3aKWJA7
Breadboard: amzn.to/2Npu9f5
www.adafruit.com
www.sparkfun.com
Helpfu...
Просмотров: 11 331
Видео
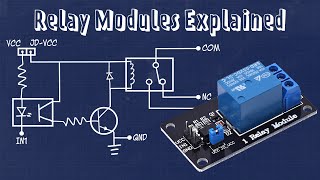

Connecting a Relay Module to a Microcontroller
Просмотров 272 тыс.3 года назад
Today we are driving high current high voltage applications using only a microcontroller and relay. To accomplish this, we are going to take a closer look at a few different types of relay modules you might find across the Internet. We will first go over the components and connections available on each module, then we will go over the schematic to get a better understanding of how each module w...

Arduino Basics - INPUT and INPUT_PULLUP Using a Button
Просмотров 3 тыс.3 года назад
In this video we learn how to read digital inputs using an Arduino Uno and build a circuit to include pushbutton control. We will also take a look at how to use the internal Pull Up resistor to streamline our circuit. 00:00 Intro 00:14 Pushbutton Description 00:45 Circuit Build 01:28 Programming with "PULLUP" 02:23 Demo with the External Pullup resistor 02:31 External PULLUP Resistor 03:04 Demo...

Analog (ADC) Inputs on the Raspberry Pi Pico with MicroPython
Просмотров 16 тыс.3 года назад
In this video we are going to learn how read analog inputs using the Raspberry Pi Pico and build a circuit to include a potentiometer. With this we will be able to adjust and read voltages across the range from 0 to 3.3 volts. To accomplish this, we will use the Analog to Digital Converter built right into our microcontroller. 00:00 Intro 00:30 ADC Introduction 01:30 Pico's ADC Channels 02:03 W...

Digital Inputs with the Raspberry Pi Pico and MicroPython
Просмотров 3,1 тыс.3 года назад
In this video we will will learn how to read digital inputs using the Pi Pico and build a circuit to include push button control. 00:00 Intro 00:19 What is a button 00:59 Circuit Build 01:51 Pullup Resistor 02:09 Floating GPIO 02:28 Code Walk Through 03:42 Internal Pullup Resistor 04:18 Recap The parts you will need to follow along with this video are: 1x Raspberry Pi Pico 1x Micro USB Cable 1x...

Getting Started with the Raspberry Pi Pico and MicroPython
Просмотров 1 тыс.3 года назад
In this video we will look at the new Raspberry Pi Pico board. We will setup the programming environment and write our first couple applications using MicroPython. 00:00 Intro 00:35 Specifications 01:21 Programming Options 01:42 Thonny IDE Setup 02:19 MicroPython Firmware 03:35 Programming through the Shell 04:57 Programming through the Script Area 07:00 Recap The parts you will need to follow ...

Arduino Basics - Flash an LED with Digital Outputs
Просмотров 4303 года назад
In this video we learn how to build a basic electrical circuit, we cover the structure of an Arduino Sketch and program an Arduino Uno to flash an LED on and off every half second. 0:00 Intro 0:23 Parts needed to build the circuit 0:39 What are General Purpose Input Pins 1:32 Building a basic LED circuit 2:39 Writing your first Arduino Sketch 6:04 Verify your sketch 6:48 Upload your sketch to a...

Arduino Basics - Getting Started with Arduino
Просмотров 8854 года назад
In this video we discuss what the Arduino Platform is and how to get started. I will show you how to download the Arduino IDE and we will discuss how the Arduino Core helps simplify writing microcontroller applications. Timestamps: 00:00 Arduino Basics - Getting Started with the Arduino Uno 01:01 What can we do with an Arduino 01:36 Arduino Hardware Options 03:50 Download the Arduino IDE 05:02 ...
Excellent. Thx. Please keep looking for the topics which "everyone knows but no one knows EXACTLY" and create videos about them in this super clear way for us electronic amateurs.
Thanks! But, How to efficiently connect thick cables to the output terminal block?. because it disconnects at the slightest movement
@@cygnus2k I would recommend using ferrule connectors on the end of the wires.
@@hensonbl Thanks! I found out what is causing the disconnection, it is the overpressure on the terminal screw. Now works fine
Thx, now i am ahead of the rest of my class!
سلام بسیار خوب و قشنگ توضیح دادیدی به صورت تصویری با اینکه کمی زبان انگلیسی میفهمم ولی به صورت شماتیک درست منظور شما رافهمیدم با تشکر و احترام
Hi Brad, I watched your videos about Pi Pico. I teach microPython to kids in Poland. Thanks to these videos we are also learning English together, because your message is concise and clear. Thank you and I look forward to your next productions.
Excellent video, thank you!
Thank you for this video sir it so related for what im seaching. Can i use this board sir from audio out of the cctv camera so that i can trigered 24 volts alarm and lights from the output of module thank you
what if its a 2 pin pot?
Very good treatment of hard-to-find info! On "Relay Module One" and connecting a/the GPIO Pin to VCC so you can have the relay turn on when the GPIO pin is HI. (starting at around 5:30): Nice for modules with only one relay. But my multi-relay modules only have one VCC pin.
Best explanation I've found for the relay module. You covered the technical stuff in depth without over-complicating it. You covered the traps well, which was what I was wanting to know. I've worked with relays in industrial applications, so I had my suspicions about the jumper. Thank you for confirming the internal circuitry on this.
Is it okay to use the relay with the high and low switch with an external 5v power supply while sharing the ground from the relay/power supply and microcontroller. Im trying to connect my xiao rp2040 which is 3.3 volt and a 5v 30a relay.
Great video Brad. Thanks. I was really struggling trying to understand how the jumper in the Relay Module Two unit actually worked. I didn't realize that the optocoupler input was bi-directional. I know this video is a few years old and that most of those watching aren't going to build their own circuits from this tutorial, but I think there is an issue with the circuit diagram for the Relay Module Two. I'm pretty sure that you need a resistor between DC+ and the optocoupler or the optocoupler will sink as much current as DC+ will give it, causing it to burn out. I know there is one in the actual unit.
Just came back to give you a like and subscribe. Great content.
fantastic explanation for a noob like myself! Thank you for sharing.
thanks bro
This is awful technical. I just need the relay to switch from a solid state switch to fire a motor
I have been looking for exactly this! Thanks for making this.
Very well explained. Thank you for posting this video.
I believe your "Relay Two" schematic is wrong. The optocoupler is open-collector and the way you have drawn it you are shorting the 5V to ground when optocoupler transistor turns on.
This is a great video...question...is there another way to set the relay from input low to input high?, the option you mentioned would only work with a single relay board, i'm using a dual relay board. already try to set the output GIO pin to high but it did not work... thank you
It works when I did with external supply , helps a Lot
I hate active low modules 😂
Good 👍
helped a lot with my project thanks
Amazing explanation, after viewing, rushed to watch for more of the similar explanations and... daamn
This is a high-quality educational video. It is unique in the sense that it describes the physics inside the relays. In addition, it shows three different ways of connecting the relay module at 3:31, 5:10 and 5:52. Thank you very much for the video.
Very good explanation
I have the red relay. I'm trying to figure out how to get it to replace the trigger on my plasma torch for CNC use. I have the MKS DLC 32 control board. The instructions suggest I use the spindle output as the trigger source. The debt connection is 24 volts since it outputs whatever the power supply is. I just want to use that 24 volt spindle connection to trigger the relay which will finalize the wire connection to the plasma machine. Can you tell me how to do it in terms that a caveman could understand? Thanks. There's two wires that travel from the plasma machine to the trigger on the torch handle. Squeezing the trigger simply closest the connection. That's all I'm trying to do.
thank you, great explanation of various module type and it circuit schematic
Thank you for the excellent and clear explanation. Regarding relay module two, would it be possible to isolate relay and signal power by discarding the jumper and applying DC+ to the DC+ terminal for the relay coil (or the LOW pin of the 3 pin jumper) and signal power to the middle pin of the three pin jumper (either DC- or DC+ depending on whether we want to trigger high or low). Edit: I tried it and it works!
nice
nice.. do you have circuit diagram of this?
I have a dso with a frequency of 100 MHz, and I use Thonny IDE and Micro Python with a Rp2040 system clock of 125 MHz. I also know the pwm frequency, which is 62.5 MHz. I have to make a pwm in an RP2040 at 50 MHz, thus here's my code: from machine import Pin, PWM import time pwm_pin = 0 pwm = PWM(pwm_pin) pwm.freq(1000000) # Set PWM frequency in Hz # Set fixed duty cycle pwm.duty_u16(32768) # 50% duty cycle (32768 out of 65535) I want a square wave, however the PWM produced noises and ripples with this code. Thus, how can I lessen the noise and ripples? help me sir
Really helped out a lot with the internal pullup, forgot to wire it in and boom! saved by the code
Thanks for your video. Excellent explanation.
Nicely done... Thanks.... What is the highest freq Pico can go... ? And how do u provide a delay in bw two PWM signals
Cách ly mà dùng chung mass ?
im still confuse..idk which is the problem..if it is, the code, the connection, the relay...its like the permutation on my situation, figuring different combination of trials..im giving up
either NPN or PNP will work for me switching RF signal inputs and outputs
Insta Subscribed
This is the best explanation of relays that I have ever encountered for so long. Thank you so much sir for this.
This was a really clear video, well-explained. In particular, I was interested in understanding what JD-Vcc was doing and why the jumper is there/not there. Thank you.
Thank you for the video Brad! I'm wondering if I can use a single power supply to power both the relay coils (JD-VCC jumper removed) but also the arduino. I guess technically the arduino wouldn't be completely isolated from the coils BUT at least the coils would be getting their power straight from the power supply instead of possibly overloading the VCC pin on the arduino right? I'd also like to know if I could possibly go a step further and use that same power supply to also provide the power on the relays themselves (only intending on turning on 5mm LED's) so basically I'm trying to use a single power supply to power the arduino, the relay coils, and the LED's connected to the relays. Starting to think maybe I could've just gone with a different module like something using mosfets? Still kind of a beginner so any suggestions are welcome! Thanks for your time!
Hi, please, can you get a 5VDC output? i want to use this as a safety relay so i want 5VDC in, 5VDC out
I've been trying to find a good explanation of how to wire these relays, the 3 pins on the load side confused me, but you cleared it up really nicely. Thanks!
After I destroy 2 esp32 boards, luckily I found this to let me not third boards. It may draw to much current by coil to wreck them before I test any project.
😂
Thank you for this video! Every other video I've found has only explained how to plug in a couple wires. You actually explained how things work and why they're set up in a certain way, which is exactly what I needed. Thank you!
All my comments based on Relay Module One. Tks.
good
Thanks for knowgable video sharing.