
- Видео 23
- Просмотров 398 166
The Bored Robot
США
Добавлен 10 июн 2020
Welcome to The Bored Robot, your premier destination for hobbyists, students, and enthusiasts eager to explore the world of practical robotics and engineering.
As a passionate advocate for hands-on learning, I've had the privilege of instructing undergraduates in robotics and participating in innovative projects. This channel is a testament to the digital age of education, providing instructional videos and project presentations.
Join me on a journey where we simplify the world of robotics and engineering, making it accessible to everyone. Together, let's unlock the potential of creativity and knowledge.
Don't miss out-subscribe now, and let's embark on an adventure of exploration, creation, and enlightenment together!
An Easy Way to Read All RC Channels at Once with Arduino
Thanks to the sponsor of this video:
www.pcbway.com
Get 10 PCB's for only $5
In this video, I demonstrate the easier way to read RC signals from a receiver with your Arduino Uno
Need the Code?
theboredrobot.com/pages/contact
Check out this Reference Desk Mat for Arduino:
amzn.to/3vO6QBl
Video Timestamps:
0:00 - Introduction
1:20 - Sponsor
1:51 - Step 1
2:36 - Step 2
2:50 - Step 3
3:07 - Step 4
3:40 - Step 5
4:07 - Conclusion
👉Subscribe for more robotics and engineering tips:
ruclips.net/channel/UCMCGV13i2kt4VQuFBH6O2Vg
Share this video with a friend:
ruclips.net/video/MsUL-RY8ZrY/видео.html
Website:
www.theboredrobot.com/
Parts needed for this example:
Arduino Uno R4 - amzn.to/3V1odcD
Jumper Wires - amzn.to/47D...
Просмотров: 3 112
Видео


Turning Arduino's LED Matrix into a Serial Plotter
Просмотров 2,6 тыс.6 месяцев назад
In this video, I demonstrate how to use the LED matrix on the new Arduino Uno R4 Wifi, as a serial plotter and monitor. Check out this Reference Desk Mat for Arduino: amzn.to/3vO6QBl Video Timestamps: 0:00 - Introduction 0:34 - Wiring 0:42 - Example of turning the LED matrix into a serial monitor 0:50 - Code for the serial monitor example 1:59 - Limitation of serial monitor example 2:07 - Up an...

How to Change the X and Y Scale on the Arduino Serial Plotter
Просмотров 14 тыс.7 месяцев назад
In this video, I demonstrate how to change the scale of the X-axis and Y-axis for the serial plotter in the most recent version of the Arduino IDE. Note: In the video, I use the term "data points" to describe the length of the x-axis. What I actually meant is that the x-axis will only have a range of 50. There can be much more than 50 data points within this range. Check out this Reference Desk...

Synchronizing Motor Position with Encoders, PID Control and Arduino
Просмотров 62 тыс.8 месяцев назад
In this video, I demonstrate how to use PID Control to synch the positions of two motors with encoders by only using two interrupt pins on the Arduino. Check out this Reference Desk Mat for Arduino: amzn.to/3vO6QBl Video Timestamps: 0:00 - Introduction 0:33 - PID Control for a single motor 0:40 - Parts needed 0:46 - Pin out for the motor and encoder 0:58 - Wiring the circuit 1:16 - Arduino code...

Real-Time Data Visualization and CSV Logging with Arduino and Python
Просмотров 15 тыс.10 месяцев назад
In this video, I demonstrate how to send sensor data from the Arduino, plot the data in python, and then automatically save the data to a CSV file. Check out this Reference Desk Mat for Arduino: amzn.to/3vO6QBl Video Timestamps: 0:00 - Introduction 0:11 - Arduino Code 0:59 - Python Code 4:15 - Data Visualization in Arduino 4:25 - Data Visualization in Python 4:34 - Saving data to a CSV 👉Subscri...
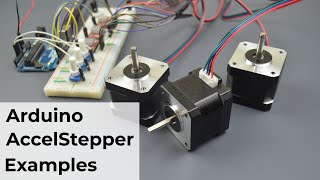
Controlling 3 Stepper Motors with the AccelStepper Library for Arduino
Просмотров 57 тыс.11 месяцев назад
In this video, I demonstrate how to simultaneously control three stepper motors with the Arduino Uno and the Accel Stepper Library with discrete examples. Check out this Reference Desk Mat for Arduino: amzn.to/3vO6QBl Video Timestamps: 0:00 - Introduction 0:25 - Installing the library 0:45 - Parts needed 1:02 - Wiring the circuit 1:48 - Moving a single motor to a specific position (blocking) 4:...

Powering the Arduino Uno without a USB Cable
Просмотров 7 тыс.Год назад
In this example, I demonstrate how to power the Arduino Uno without the USB Cable. Check out this Reference Desk Mat for Arduino: amzn.to/3vO6QBl 👉Subscribe for more robotics and engineering tips: ruclips.net/channel/UCMCGV13i2kt4VQuFBH6O2Vg Share this video with a friend: ruclips.net/video/XDTr1hyQUtY/видео.html Website: www.theboredrobot.com/ Parts needed for this example: Arduino Uno- amzn.t...

Controlling a Stepper Motor with a Remote Control and Arduino
Просмотров 15 тыс.Год назад
In this example, I demonstrate how to use Arduino and remote control to control the speed of a stepper motor. Check out this Reference Desk Mat for Arduino: amzn.to/3vO6QBl 👉Subscribe for more robotics and engineering tips: ruclips.net/channel/UCMCGV13i2kt4VQuFBH6O2Vg Share this video with a friend: ruclips.net/video/vpqQozhfRqY/видео.html Website: www.theboredrobot.com/ Parts needed for this e...

Simultaneously Reading Two PWM Signals from an RC Receiver with Arduino
Просмотров 14 тыс.2 года назад
This is an example that demonstrates how to use Arduino to simultaneously read two RC signals (50 Hz PWM) using external interrupts. Check out this Reference Desk Mat for Arduino: amzn.to/3vO6QBl 👉Subscribe for more robotics and engineering tips: ruclips.net/channel/UCMCGV13i2kt4VQuFBH6O2Vg Share this video with a friend: ruclips.net/video/PdBS_W5tc-0/видео.html Website: www.theboredrobot.com/ ...
Reading PWM Values from an RC Receiver using Arduino
Просмотров 51 тыс.2 года назад
This is an example that demonstrates how to use Arduino to read RC values (50 Hz PWM) using pulseIn() or external interrupts. Check out this Reference Desk Mat for Arduino: amzn.to/3vO6QBl 👉Subscribe for more robotics and engineering tips: ruclips.net/channel/UCMCGV13i2kt4VQuFBH6O2Vg Share this video with a friend: ruclips.net/video/UZKxUFkwCc8/видео.html Website: www.theboredrobot.com/ Parts n...
Controlling a DC Brushed Motor with the L298N Motor Controller
Просмотров 3,3 тыс.2 года назад
This is an example that demonstrates how to control a common, inexpensive DC brushed gear motor with the L298N motor controller board. Check out this Reference Desk Mat for Arduino: amzn.to/3vO6QBl 👉Subscribe for more robotics and engineering tips: ruclips.net/channel/UCMCGV13i2kt4VQuFBH6O2Vg Share this video with a friend: ruclips.net/video/9-QtE3RsSc4/видео.html Website: www.theboredrobot.com...
Simultaneously Controlling Stepper Motors with Arduino
Просмотров 54 тыс.3 года назад
This is an example that demonstrates how to simultaneously control two stepper motors with an Arduino Nano. Check out this Reference Desk Mat for Arduino: amzn.to/3vO6QBl 👉Subscribe for more robotics and engineering tips: ruclips.net/channel/UCMCGV13i2kt4VQuFBH6O2Vg Share this video with a friend: ruclips.net/video/Yvth5tLuXd4/видео.html Website: www.theboredrobot.com/ Parts needed for this exa...
DIY Camera Phone Slider
Просмотров 1,2 тыс.3 года назад
Here's a build of an Arduino camera phone slider that uses two stepper motors for sliding and panning motion. Sliding is created through a lead screw and extruded rail Check out this Reference Desk Mat for Arduino: amzn.to/3vO6QBl 👉Subscribe for more robotics and engineering tips: ruclips.net/channel/UCMCGV13i2kt4VQuFBH6O2Vg Share this video with a friend: ruclips.net/video/_tvxCVfMb60/видео.ht...
Controlling a Brushless Motor with Arduino
Просмотров 28 тыс.3 года назад
This is an example that demonstrates how to control a brushless motor with a potentiometer and the Arduino Uno. Check out this Reference Desk Mat for Arduino: amzn.to/3vO6QBl 👉Subscribe for more robotics and engineering tips: ruclips.net/channel/UCMCGV13i2kt4VQuFBH6O2Vg Share this video with a friend: ruclips.net/video/_tvxCVfMb60/видео.html Website: www.theboredrobot.com/ Affiliate Links: Brus...
How to Control a Servo with Arduino
Просмотров 2 тыс.3 года назад
This is an example that demonstrates how to control a servo with a potentiometer and the Arduino Uno. This also shows how to measure the pulse width and duty cycle of the pulse width modulation (PWM) signal. Check out this Reference Desk Mat for Arduino: amzn.to/3vO6QBl 👉Subscribe for more robotics and engineering tips: ruclips.net/channel/UCMCGV13i2kt4VQuFBH6O2Vg Share this video with a friend...
CAD Models for Two Different Motorized Camera Phone Sliders
Просмотров 2223 года назад
CAD Models for Two Different Motorized Camera Phone Sliders
How to Create an Analog Signal with Arduino
Просмотров 2,3 тыс.3 года назад
How to Create an Analog Signal with Arduino
How to use the Arudino Uno to Read Analog Values from Sensors
Просмотров 4 тыс.3 года назад
How to use the Arudino Uno to Read Analog Values from Sensors
How to use Arduino Digital Write and "If" Statements
Просмотров 3,3 тыс.3 года назад
How to use Arduino Digital Write and "If" Statements
Walking Mechanism that Mimics the Human Gait
Просмотров 18 тыс.3 года назад
Walking Mechanism that Mimics the Human Gait
How to Use Digital INPUT and INPUT_PULLUP on Arduino
Просмотров 39 тыс.3 года назад
How to Use Digital INPUT and INPUT_PULLUP on Arduino
Installing the Arduino IDE on Windows and Mac
Просмотров 9283 года назад
Installing the Arduino IDE on Windows and Mac
Is anything like this able to be done with an elrs rc link?
Thanks bro Does anyone know what is the x axis, like is it milliseconds or is it related to the baud rate
Thank you!
Thank you! Phenomenal video! I love the style I love the explanations, to the point and easy to follow!! You may was to consider adding to the end of the ser.close() in the in_close() function. My system doesn't automatically close serial communication and this may save some headaches for other viewers as well!
since arduino is running before the python script activates the time stamps do not start at 0. is there a way to make the timestamp start at zero once the python code starts?
Thank you!
How many ampere need when I used two Nema 17 with load
There must be a simple way t change this. The plotter this way looks wrong for any application. My version is 2.3.2 and it's still like this.
Where to connect the signal wire to Arduino Mega?
Lovely video! I was wondering if this code is compatible with an Arduino leonardo?
How fast can the GUI keep up with the data? I tried using pyqtgraph, using one thread to parse the serial data, and another thread for the gui updating. However, my sensor transmits at 115kbps continuously, and the GUI starts to lag behind after just a few seconds! I imagine this is such a common application that surely someone has figured it out. Haven't yet tried VizhPort ... but on the off chance that python isn't the best suited, I was thinking fl_charts and flutter!
Thanks, really good !
Glad you liked it!
on minute 9:45 u said abaout 0 and 1023 on analog read,the funcition of 0 and 1023 for what???i'm still laerning bout that
Woooow, this is the best out there on stepper control using Accel. How can i connect with you for further talks on some projects we can collaborate on. LinkedIn, Email, ????
info@theboredrobot.com
sorry for my language before. But what if using nodemcu (esp8266) ? is the code still same ?
I've never used that piece of hardware before. Just a quick google search shows that it uses a different language, so I do not believe the code will work.
Ok
Question: this is a 1.5A stepper motor and from what I have read so far you need to double it for microstepping, then there are 3 motors so I get a total amperage of 9amps for the system and you said you are keeping the amperage at 1 amp because you are using a breadboard. How are you getting away with only 1 amp?
I have the motor controllers set to a current that just gets the motors moving. Also, there isn't any load on the motor shafts, so the motors won't draw that much current. The setup was just for the sake of this demonstration.
I want two stepper motor Nema 17 with the load. How much ampered I need?
Hi, Is it possible to have the graph scaled to 600 points rather than the 1 point on the axis. So the incoming data is seen to the left of the graph(like the older IDE version seen in video ruclips.net/video/PPYMEBa0Vys/видео.htmlsi=__NaLmAU9nlpRXpA&t=1673). I don't want the automatic update of the X-axis. Thanks
I haven't looked into trying to make that happen. Recently, I've just been plotting data with Python to get more options with what I display.
@@TheBoredRobotLLC Thank you for your reply. I went back to the old version to output this data again. 😀
I am trying to control two stepper motors using arduino uno and tb6600 motor drivers and control them using Radio controller . However when i run my code only one stepper motor work while the other doesn't receiver input signals from transmitter
It's hard to say without knowing more. My first step would be to check the wiring and make sure that each of the motors runs individually first.
Exactly what I was looking for. Perfect! Thank you!
Great to hear!
Thank you for this video. It is helpful.
Glad it was helpful!
What is the advantage/disadvantage of using external pull up resistor other than the internal one?
One advantage of an external one is if you wanted to use a resistor with a different resistance value than the internal one.
@@TheBoredRobotLLC but why does that matter? Isnt the point of using pull up resistor is so that ur button is not in floating state? So the value of resistor doesn't matter anyway as long as it is high enough to be stable
@@rafiihsanalfathin9479 Yes that is true, but by variable resistance, I was referring to applications that you may want to control current draw.
I have to run the python file when the Arduino starts running?
Do not open the serial monitor in Arduino. Get the code uploaded to your arduino first. Then run the python code.
link of the code !
github.com/TheBoredRobot/RUclips-Code
Avrei bisogno di leggere 6 canali da un ricevitore RC, come devo modificare la Sketch?
I have a video update on this: ruclips.net/video/MsUL-RY8ZrY/видео.htmlsi=A3ninmmYJwcJUuIB
I have a question, I'm using a drv8825-ish in 1\32 micro step, and the motor moves terribly slow. What can I do to make it go faster? My ultimate goal is just a constant rotation speed which varies per motor so that I can use it in my drawing machine
It's going slow probably because you're doing 1/32 steps. Changing to full step or even half step will make it faster, but you may give up precision. It depends on your application.
How did you get it!??? Thank you very much!!!!
I'm glad it helped. I had to look through some forums on this one.
volatile long StartTime = 0; volatile long CurrentTime = 0; volatile long Pulses = 0; int PulseWidth void setup() { Serial.begin(9600); pinMode(RCPin, INPUT_PULLUP); attachInterrupt(digtalPinToInterrupt(RCPin),PulseTimer,CHANGE); } void loop() { if (Pulses < 2000){ PulseWidth = Pulses; } Serial.println(PulseWidth); } void PulseTimer(){ CurrentTime = micros(); if (CurrentTime > StartTime){ Pulses = CurrentTime - StartTime; StartTime = CurrentTime; } }
I have an update to this video to make things easier: ruclips.net/video/MsUL-RY8ZrY/видео.htmlsi=HysbnLop4zBKpxot
Excellent video - Thanks! Consider using unsigned math on micros() it simplifies the code (no if() needed). Consider a small state machine in the inyerrupts. On a rising edge save time and on falling edge compute delta and set a new system state. Thid avoids some complications and can help clarify the interface.
Thanks for the advice! I also found another approach and I did that on another video as well. ruclips.net/video/MsUL-RY8ZrY/видео.htmlsi=HysbnLop4zBKpxot
if yes can you provide the circuit diagram and code for it
github.com/TheBoredRobot/RUclips-Code
can we control the position of stepper motor with tb6600 and potentiometer
I have a video on this. You should be able to do the same with the motor controller that you mentioned. ruclips.net/video/QRCvC5xhJCw/видео.htmlsi=tg4ZDeatLPXbjkhq
Please could you release code for this that uses Rc PWM for the control input? My personal use requirement is 2 Rc channel input for 2 stepper controls so this would work great for me if I could use Rc input to control it. Steve.
github.com/TheBoredRobot/RUclips-Code
Oh wow this is incredible, I also manage to make the Y axis modification work on Mac, you just need to do the modification in VScode, thank you so much kind sir.
I'm happy it was useful.
Thanks!!!!!
Happy to help
ขอบคุณมากครับ
You're welcome!
Outputs were visibly not synchronised.
Arduino not synchronous in general, but this did approach did the job for the application of getting two walking legs to sync up for another project. I do agree there is still plenty of room for improvement with adjusting gains or even a completely different method.
Quiero fabricar un afilador de herramientas, quiero agregarle un eje mas. Tres ejes que se muevan de forma lineal y un eje rotativo. Display para agregar valores en pantalla para el desplazamiento y valores de angulos para que gire la herramienta. Hay formas que me puedas ayudar?
I had to use google translate on this one. The library works for additional motors. You'll just have to make sure you have enough pins on your Arduino.
In this video and on your blog you show schematics and a PCB for two modules to control two motors but the Arduino code provided is only for one, I understand enough to see its only for one but don't have the knowledge to modify it myself for two and would likely just break the code, could you provide the code for the two modules please? I want to use this to control zoom and focus on a motorised lens for a HD FPV system on a Rc plane!
My suggestions is to use the AccelStepper library. See video below. The code from this video you're commenting on can get a bit clunky when you start adding more motors. ruclips.net/video/QRCvC5xhJCw/видео.html&lc=UgzrPGWk_RqfpmJ7d-d4AaABAg If you add an additional channel from you remote control, then you can have it correspond with the additional motor.
@@TheBoredRobotLLC I got your email, yes it was me! I had no idea you had messaged me here, for some reason youtube turned off all notifications for comment reply's so I didn't know. Had a look at the linked video and that looks better, especially the position control which might be better for lens control than moving a motor then needing to return the control to 0 to halt it in that position but the video only talks about using Pots for control and not using Rc PWM. I want to use the Pots on my transmitter so I can use either continuous movement or position control as I would not be using Sticks. I am very comfortable with wiring but coding is not something I have been able to absorb and my limit is being able to inspect code and sometimes duplicate existing parameters for more of the same, 95% of attempts to modify further than that results in broken code :( How would I go about using the Accelstepper example but with RC pwm input instead of standard pots please?
If you're able to read signals from the remote control, you can map that to another variable that would directly drive the variable that is responsible for the movement of the stepper motor.
Is it possible to stop the motor at same time with different position?
Yes, there are many ways to do that. There are stop commands within the library or send a signal to EN pin on the driver itself at the same time.
thanks code works
Glad to hear it!
It's really helpful! Thank you!
Glad it was helpful!
thanks a lot
Glad it was helpful!
Hi great video. But my code does not work. It just displays a blank plot and says: Animation was deleted without rendering anything
Sorry to hear it doesn't work. If you want you can try copy and pasting the code: github.com/TheBoredRobot/RUclips-Code
Consider adjust line: ani = FuncAnimation(fig, update_plot, interval=10) from 10 to another number. My system works better with 50 miliseconds instead of 10
Out of interest, if one motor is moved by hand when stationary, does the other motor follow the other still?
Yes, it should still work. If you ever tried to take the back of one of these motors off to expose the encoder, you're count should still go up if you move the encoder by hand. However, the motor shafts in this video are pretty hard to move by hand because of the gear ratio.
THANK YOU VERY MUCH, you saved me i was looking the documentation or arduino but couldn't find anything so thaaaank yoouuuuu
Glad I could help!
Hello bro I'm doing a project that will use 3 stepper motors So far I'm still in my prototype for this project (Of 3 engines I'm only testing 1) I was using the L298n driver I saw this driver there and found it more interesting The A4988 It requires less wire connected to Arduino, enabling a greater number of motors connected at the same time, interesting I would like to know if you have seen any difference in practice using these drivers, if, for example, it is more interesting to use an L298N or an A4988 to keep a stepper motor on for longer A big hug from Brazil :)
I really haven't tested both of them extensively. Both have worked for my projects in the past. If one of the options can clean up your wiring, then it would make sense to go with that one.
No matter what value I put on the useState sentence, the plotter stays as default on the x-axis. Any suggestions?
did you close the plotter and restart it after changing the value?
@@Jesse-fh2ox Yes, I did. I even restart the IDE, and also changed the value several times.
I really don't know of a solution to this without seeing the full picture of your system. Perhaps a reinstall might do the trick?
Ok.... but... why? ha ha ha. I was expecting a particular practical reason for that.
This video was made for a group of students who had built walking mechanisms that needed the linkages to be in sync. It was for a very specific project.
I want to do this for arudino nano how much battery required for this and which one where to apply power in arudino nano there power supply pin
The nano accepts 7-12 volts and you would connect the positive end of the batteries to Vin and the negative end to any GND pin.
Amazing video and absolute gem of a channel! I have just started getting into robotics and had spent weeks struggling with how to solve this. Sod's law I found an old archived post that described something similar on the same day I found this video!! Just wish I had found this channel sooner haha :)
Glad to help!